INSERT INTO
your_table (
Id_1,
Id_2,
desc,
total
) EXECUTE your_store @id_1, @id_2
INSERT INTO
your_table (
Id_1,
Id_2,
desc,
total
) EXECUTE your_store @id_1, @id_2
Select Id_ as Id
Into #Temp
From your_table
where that = 'blabla' and this = 'something something dark side'
Declare @Id int
-- WHILE
While (Select Count(*) From #Temp) > 0
Begin
Select Top 1 @Id = Id From #Temp
-- Do some processing here
-- OK
Delete #Temp Where Id = @Id
End
SELECT [name], create_date, modify_date
FROM sys.procedures
ORDER BY 3 DESC;
https://dba-presents.com/index.php/databases/sql-server/42-shredding-xml-to-tables-with-openxml
Storing data in XML documents and in tables have different advantages and disadvantages. For example tables make joining data easy so even if you receive data in XML format or even store it that way, you may want to convert it to tables even temporarily.
One of the possible ways is using OPENXML. It is a statement that returns a view with data based on parameters passed into it. There are two obligatory arguments:
The third but optional argument is a flag indicating whether XML attributes, elements or both are sources of the data in the XML document.
DECLARE @xml NVARCHAR(4000);
DECLARE @doc INT;
SET @xml =
'<transactions>
    <group>
        <name>gold members</name>
        <account id="1">
            <name>Account 1</name>
            <transaction id="1">
                <type>credit</type>
                <value>10000.0000</value>
            </transaction>
        </account>
    </group>
    <group>
        <name>regular members</name>
        <account id="2">
            <name>Account 2</name>
            <transaction id="5">
                <type>payment</type>
                <value>-103.0000</value>
            </transaction>
        </account>
    </group>
    <group>
        <name>regular members</name>
        <account id="3">
            <name>Account 3</name>
            <transaction id="2">
                <type>credit</type>
                <value>3.9500</value>
            </transaction>
        </account>
    </group>
</transactions>';

EXEC sp_xml_preparedocument @doc OUTPUT, @xml;

SELECT *
FROM OPENXML(@doc, '/transactions/group/account/transaction', 11)
         WITH (id INT, type NVARCHAR(255), value MONEY);

EXEC sp_xml_removedocument @doc;
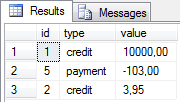
At the beginning the sp_xml_preparedocument procedure is used to create DOM from the XML document. The DOM object gets a handle assigned (@doc) which is used for referencing in the OPENXML statement. The /transactions/group/account/transaction points to nodes in the document that are converted to rows. The number 11 indicates that both: attributes and elements store data. Other options are:
The WITH part indicates columns that will be created in the result set. Names of the columns are names of the attributes/elements in the document at the same time. It means that the id column will contain data from the /transactions/group/account/transaction/id path, type will use data from the /transactions/group/account/transaction/type path and the database engine will look into /transactions/group/account/transaction/value path for the value column.
It is worth emphasizing that the id column comes from an attribute while two other columns are extracted from elements. The flag argument of OPENXML that is set to 11 allows that. If 1 was used, the type and value columns would contain NULL values. If 2 was used, the id column would be NULL.
Obviously, as the DOM object was created, it had to be destroyed at the end. The sp_xml_removedocument procedure did exactly that.
The previous example showed the whole concept of shredding XML documents to tables with OPENXML statement. Although, I believe you remember that I was able to produce the XML document with only one query but the above example extracts only a part of data. Why could not I convert the whole XML document in one shot, not only the transaction nodes? Let's assume I want to get a table with the following columns:
They all describe somehow a transaction but this data comes from different nesting levels from the XML document. Fortunately, OPENXML allows being more precise in directing the SQL Server engine what is the source of data. The exact path can be defined separately for each column in the WITH clause as in the below script.
DECLARE @xml NVARCHAR(4000);
DECLARE @doc INT;
SET @xml =
'<transactions>
    <group>
        <name>gold members</name>
        <account id="1">
            <name>Account 1</name>
            <transaction id="1">
                <type>credit</type>
                <value>10000.0000</value>
            </transaction>
        </account>
    </group>
    <group>
        <name>regular members</name>
        <account id="2">
            <name>Account 2</name>
            <transaction id="5">
                <type>payment</type>
                <value>-103.0000</value>
            </transaction>
        </account>
    </group>
    <group>
        <name>regular members</name>
        <account id="3">
            <name>Account 3</name>
            <transaction id="2">
                <type>credit</type>
                <value>3.9500</value>
            </transaction>
        </account>
    </group>
</transactions>';

EXEC sp_xml_preparedocument @doc OUTPUT, @xml;

SELECT *
FROM OPENXML(@doc, '/transactions/group/account/transaction', 11)
         WITH (groupName NVARCHAR(255) '../../name',
		accountId INT '../@id', accountName NVARCHAR(255) '../name',
		transId INT '@id', transType NVARCHAR(255) 'type', transValue MONEY 'value');

EXEC sp_xml_removedocument @doc;
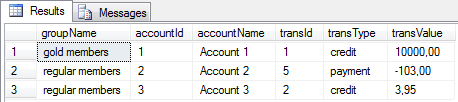
There are a few interesting items:
Probably some of you reading about creating a DOM object for an XML document wondered isn't it an overhead compared to parsing it on the fly? Hmm ... yeah. It might be. If you need to convert multiple rows with XML documents to a table, it might be a performance killer to create a DOM object separately for each row. On the other hand, if you want to execute many queries with OPENXML on the same document, this solution may be perfect.
Nevertheless, there are no solutions that are always perfect or terrible. This one is not an exception.
Look forward to my next articles about XML support in SQL Server, I may write about the second option of shredding XML documents to relational form.
https://parallelcodes.com/connect-android-to-ms-sql-database-2/
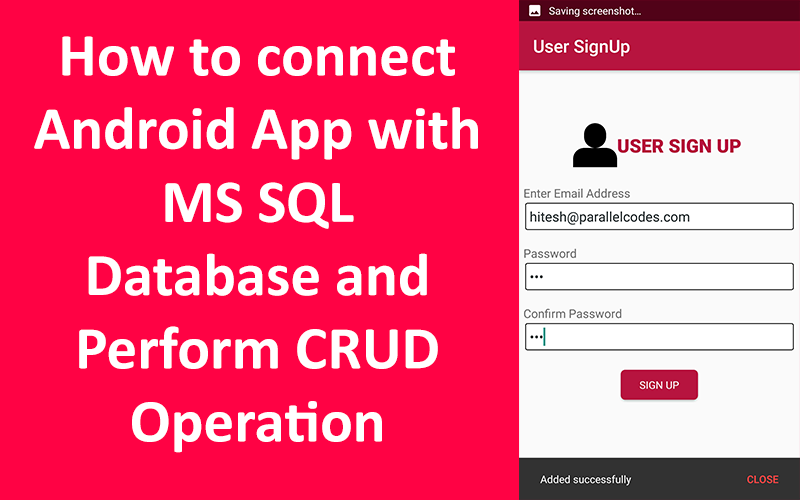
In this post we will see how we can connect our Android Application to MS SQL Database server directly and perform CRUD operations. We will use JTDS.jar library for connecting with Database.
Download jtds library using this link: Jtds library.
Next we will create our MS SQL Database. My Database name is CustomerDB. It is a Microsoft SQL 2014 Database.
Script:
--create database CustomerDB
--USE [CustomersDB]

CREATE TABLE [dbo].[tblUsers](
[Id] [int] IDENTITY(1,1) NOT NULL,
[UserId] [nvarchar](50) NOT NULL,
[Password] [nvarchar](50) NOT NULL,
[OnDate] [datetime] NULL DEFAULT (getdate()),
[UserRole] [nvarchar](50) NULL
)
Copy the downloaded library in your Android project’s library folder and add it as a library to your project.
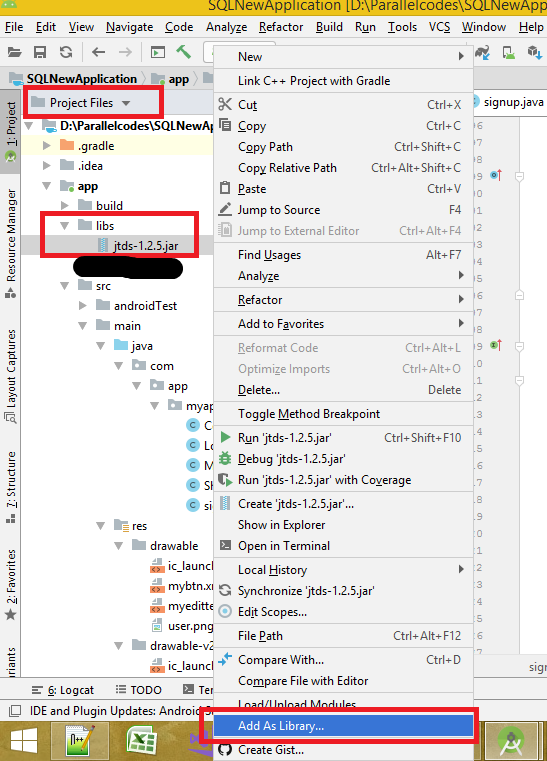
Android MS SQL – Add as Library JTDS library
Now let’s create the layout of our app.
Create a layout file with name signup.xml in your res > layout > folder and edit it as below:
res > layout > signup.xml:
<?xml version="1.0" encoding="utf-8"?>
<LinearLayout xmlns:android="http://schemas.android.com/apk/res/android"
android:layout_width="match_parent"
android:layout_height="match_parent"
android:orientation="vertical"
android:id="@+id/lvparent"
android:padding="5dp">

<LinearLayout
android:layout_width="wrap_content"
android:layout_height="wrap_content"
android:layout_gravity="center_horizontal"
android:layout_marginTop="50dp"
android:orientation="horizontal"
android:padding="5dp">

<ImageView
android:layout_width="50dp"
android:layout_height="50dp"
android:layout_gravity="center_vertical"
android:src="@drawable/user" />

<TextView
android:layout_width="match_parent"
android:layout_height="wrap_content"
android:layout_gravity="center_vertical"
android:layout_marginRight="5dp"
android:fontFamily="sans-serif-black"
android:gravity="center_horizontal"
android:text="USER SIGN UP"
android:textColor="#b71540"
android:textSize="25sp" />
</LinearLayout>

<TextView
android:layout_width="match_parent"
android:layout_height="wrap_content"
android:layout_marginTop="15dp"
android:fontFamily="sans-serif-condensed-medium"
android:gravity="start"
android:text="Enter Email Address"
android:textSize="16sp" />

<EditText
android:id="@+id/edtEmailAddress"
android:layout_width="match_parent"
android:layout_height="wrap_content"
android:layout_margin="2dp"
android:background="@drawable/myedittextbg"
android:fontFamily="sans-serif-condensed-medium"
android:hint="Email Address"
android:padding="5dp"
android:textColor="#2d3436" />

<TextView
android:layout_width="match_parent"
android:layout_height="wrap_content"
android:layout_marginTop="15dp"
android:fontFamily="sans-serif-condensed-medium"
android:gravity="start"
android:text="Password"
android:textSize="16sp" />

<EditText
android:id="@+id/edtPassword"
android:layout_width="match_parent"
android:layout_height="wrap_content"
android:layout_margin="2dp"
android:background="@drawable/myedittextbg"
android:fontFamily="sans-serif-condensed-medium"
android:hint="Enter Password"
android:padding="5dp"
android:inputType="textPassword"
android:textColor="#2d3436" />

<TextView
android:layout_width="match_parent"
android:layout_height="wrap_content"
android:layout_marginTop="15dp"
android:fontFamily="sans-serif-condensed-medium"
android:gravity="start"
android:text="Confirm Password"
android:textSize="16sp" />

<EditText
android:id="@+id/edtConfirmPassword"
android:layout_width="match_parent"
android:layout_height="wrap_content"
android:layout_margin="2dp"
android:background="@drawable/myedittextbg"
android:fontFamily="sans-serif-condensed-medium"
android:hint="Confirm Password"
android:padding="5dp"
android:inputType="textPassword"
android:textColor="#2d3436" />

<Button
android:id="@+id/btnSignUp"
android:layout_width="wrap_content"
android:layout_height="34dp"
android:layout_gravity="center_horizontal"
android:layout_marginTop="20dp"
android:background="@drawable/mybtn"
android:fontFamily="sans-serif-condensed-medium"
android:text="SIGN UP"
android:textColor="#fff" />

<ProgressBar
android:id="@+id/pbbar"
android:layout_width="wrap_content"
android:layout_height="wrap_content"
android:layout_gravity="center_horizontal" />
</LinearLayout>
Now create two drawable design files to design our buttons and edittext.
res > drawable > mybtn.xml:
<?xml version="1.0" encoding="utf-8"?>

<shape
xmlns:android="http://schemas.android.com/apk/res/android"
android:shape="rectangle"
android:padding="2dp">
<solid android:color="#b71540"/>

<corners
android:radius="5dp"/>
</shape>
res > layout > myedittextbg.xml:
<?xml version="1.0" encoding="utf-8"?>

<shape
    xmlns:android="http://schemas.android.com/apk/res/android"
    android:shape="rectangle"
    android:padding="10dp">
    <solid android:color="#fff"/>
    <stroke android:color="#000" android:width="1dp"/>
    <corners
        android:radius="2dp"/>
</shape>
This design contains three android edittext text boxes. For getting email address, password and confirm password from users. We will add user information from our app to ms sql database.
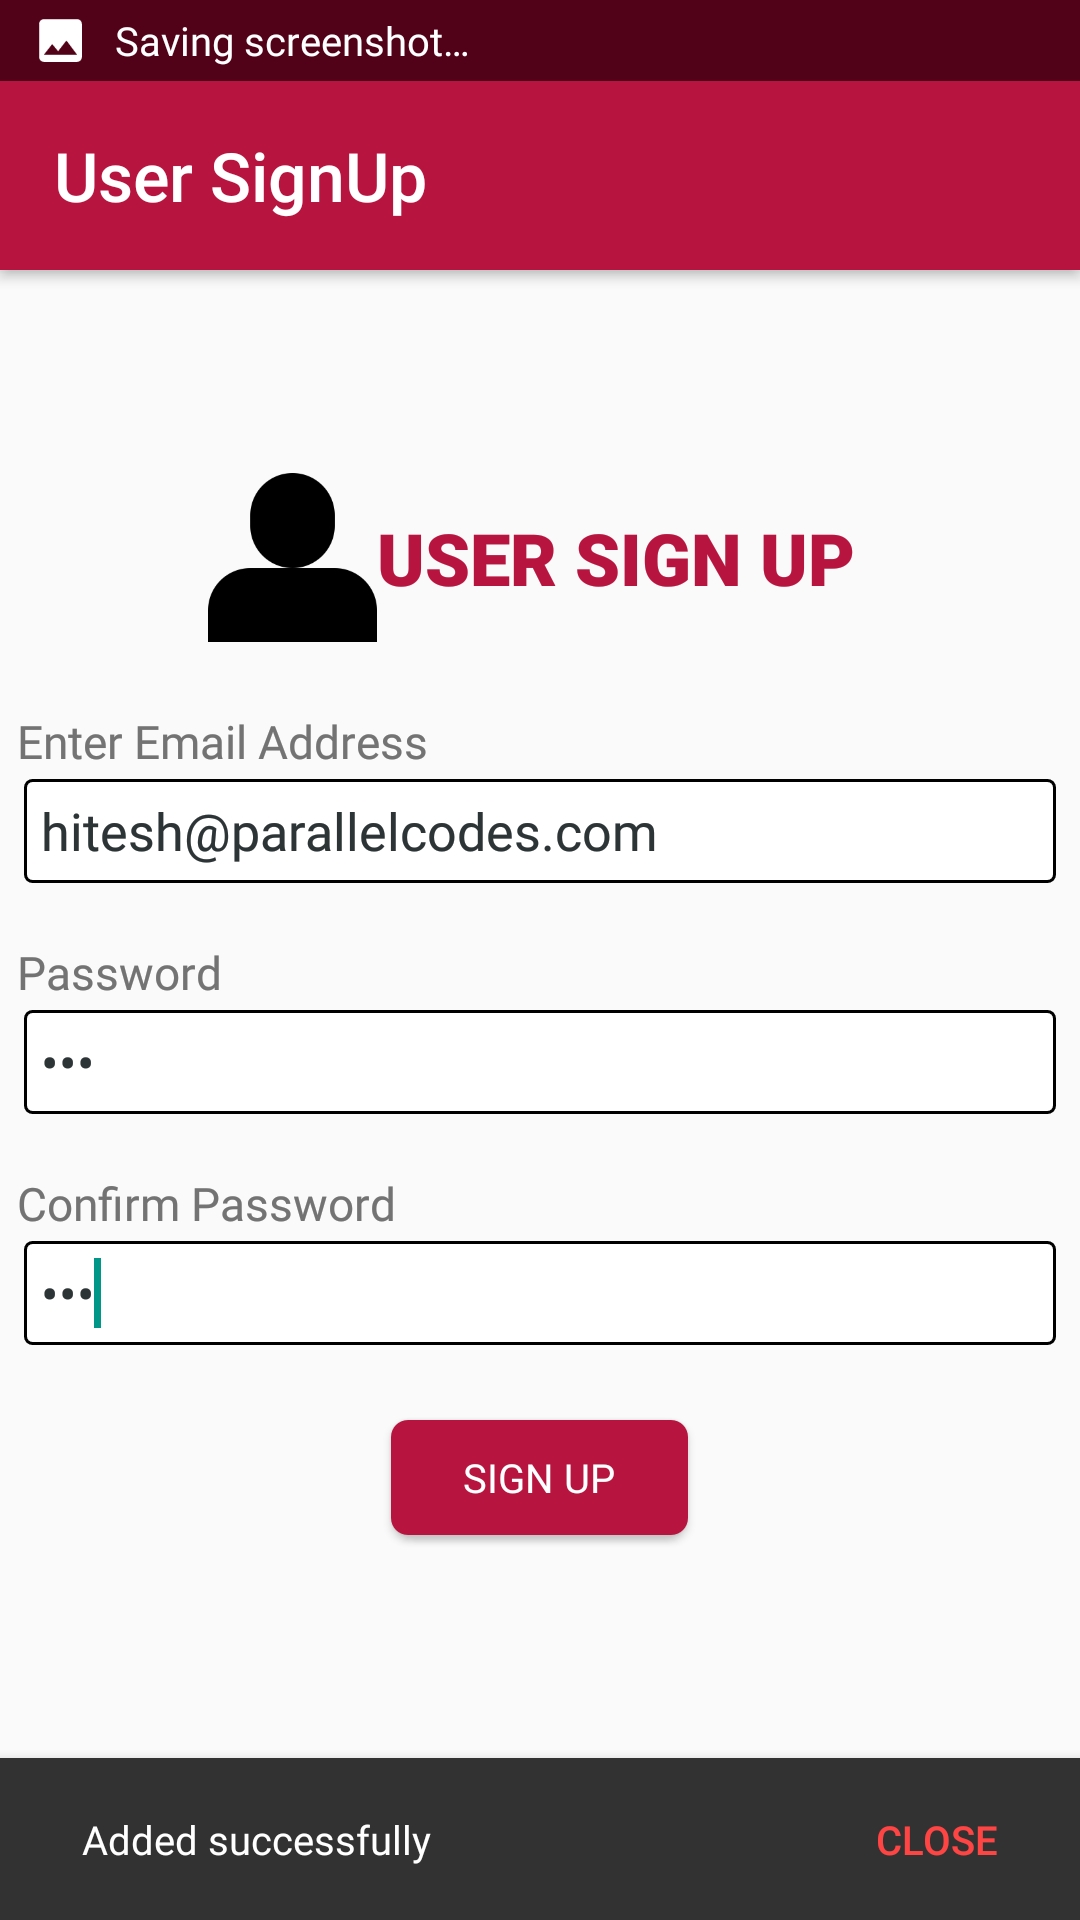
How to connect Android app with MS SQL Database
Create a java file in your android’s project with name ConnectionHelper.java and edit it as below:
ConnectionHelper.java:
package com.app.myapplication;

import android.annotation.SuppressLint;
import android.os.StrictMode;
import android.util.Log;

import java.sql.Connection;
import java.sql.DriverManager;
import java.sql.SQLException;

public class ConnectionHelper {


    @SuppressLint("NewApi")
    public static Connection CONN() {

        String _user = "sa";
        String _pass = "789";
        String _DB = "CustomersDB";
        String _server = "192.168.0.104";
        StrictMode.ThreadPolicy policy = new StrictMode.ThreadPolicy.Builder()
                .permitAll().build();
        StrictMode.setThreadPolicy(policy);
        Connection conn = null;
        String ConnURL = null;
        try {
            Class.forName("net.sourceforge.jtds.jdbc.Driver");
            ConnURL = "jdbc:jtds:sqlserver://" + _server + ";"
                    + "databaseName=" + _DB + ";user=" + _user + ";password="
                    + _pass + ";";
            conn = DriverManager.getConnection(ConnURL);
        } catch (SQLException se) {
            Log.e("ERRO", se.getMessage());
        } catch (ClassNotFoundException e) {
            Log.e("ERRO", e.getMessage());
        } catch (Exception e) {
            Log.e("ERRO", e.getMessage());
        }
        return conn;
    }
}
This class will return a database connection object which can be used to connect with our database and add users information.
Now create a class with name signup.java and edit it as below:
signup.java:
package com.app.myapplication;

import java.sql.Connection;
import java.sql.DriverManager;
import java.sql.PreparedStatement;
import java.sql.ResultSet;
import java.sql.SQLException;
import java.text.DateFormat;
import java.text.SimpleDateFormat;
import java.util.ArrayList;
import java.util.Calendar;

import android.annotation.SuppressLint;
import android.app.Activity;
import android.app.ProgressDialog;
import android.media.tv.TvContract;
import android.os.AsyncTask;
import android.os.Bundle;
import android.os.StrictMode;
import android.support.design.widget.Snackbar;
import android.support.v7.app.AppCompatActivity;
import android.util.Log;
import android.view.Menu;
import android.view.MenuItem;
import android.view.View;
import android.widget.AdapterView;
import android.widget.AdapterView.OnItemSelectedListener;
import android.widget.ArrayAdapter;
import android.widget.Button;
import android.widget.EditText;
import android.widget.LinearLayout;
import android.widget.ProgressBar;
import android.widget.Spinner;
import android.widget.Toast;

public class signup extends AppCompatActivity {

    EditText edtEmailAddress, edtPassword, edtConfirmPassword;
    Button btnSignUp;
    ProgressBar progressBar;
    LinearLayout lvparent;

    @Override
    protected void onCreate(Bundle savedInstanceState) {
        super.onCreate(savedInstanceState);
        setContentView(R.layout.signup);

        edtEmailAddress = findViewById(R.id.edtEmailAddress);
        edtPassword = findViewById(R.id.edtPassword);
        edtConfirmPassword = findViewById(R.id.edtConfirmPassword);
        btnSignUp = findViewById(R.id.btnSignUp);
        progressBar = findViewById(R.id.pbbar);
        lvparent = findViewById(R.id.lvparent);
        this.setTitle("User SignUp");

        btnSignUp.setOnClickListener(new View.OnClickListener() {
            @Override
            public void onClick(View v) {

                if (isEmpty(edtEmailAddress.getText().toString()) ||
                        isEmpty(edtPassword.getText().toString()) ||
                        isEmpty(edtConfirmPassword.getText().toString()))
                    ShowSnackBar("Please enter all fields");
                else if (!edtPassword.getText().toString().equals(edtConfirmPassword.getText().toString()))
                    ShowSnackBar("Password does not match");
                else {
                    AddUsers addUsers = new AddUsers();
                    addUsers.execute("");
                }

            }
        });
    }

    public void ShowSnackBar(String message) {
        Snackbar.make(lvparent, message, Snackbar.LENGTH_LONG)
                .setAction("CLOSE", new View.OnClickListener() {
                    @Override
                    public void onClick(View view) {

                    }
                })
                .setActionTextColor(getResources().getColor(android.R.color.holo_red_light))
                .show();
    }

    public Boolean isEmpty(String strValue) {
        if (strValue == null || strValue.trim().equals(("")))
            return true;
        else
            return false;
    }

    private class AddUsers extends AsyncTask<String, Void, String> {
        String emailId, password;


        @Override
        protected void onPreExecute() {
            super.onPreExecute();

            emailId = edtEmailAddress.getText().toString();
            password = edtPassword.getText().toString();
            progressBar.setVisibility(View.VISIBLE);
            btnSignUp.setVisibility(View.GONE);
        }

        @Override
        protected String doInBackground(String... params) {

            try {
                ConnectionHelper con = new ConnectionHelper();
                Connection connect = ConnectionHelper.CONN();

                String queryStmt = "Insert into tblUsers " +
                        " (UserId,Password,UserRole) values "
                        + "('"
                        + emailId
                        + "','"
                        + password
                        + "','User')";

                PreparedStatement preparedStatement = connect
                        .prepareStatement(queryStmt);

                preparedStatement.executeUpdate();

                preparedStatement.close();

                return "Added successfully";
            } catch (SQLException e) {
                e.printStackTrace();
                return e.getMessage().toString();
            } catch (Exception e) {
                return "Exception. Please check your code and database.";
            }
        }

        @Override
        protected void onPostExecute(String result) {

            //Toast.makeText(signup.this, result, Toast.LENGTH_SHORT).show();
            ShowSnackBar(result);
            progressBar.setVisibility(View.GONE);
            btnSignUp.setVisibility(View.VISIBLE);
            if (result.equals("Added successfully")) {
                // Clear();
            }

        }
    }

}
The AddUsers
method will add the information into our database. We will first check
if the information provided is correct and valid and then call AddUsers
method to add data.
https://stackoverflow.com/questions/18998700/sql-error-the-executequery-method-must-return-a-result-set
To return data from a SELECT Statement
String sql_select = "Select name from people";

Statement st_1 = connection.createStatement();
ResultSet rs_1 = st_1.executeQuery((sql_select));
To just run an UPDATE statement
String sql_update = "Update people set name = 'Natalie'
Statement st_2 = connection.createStatement();
st_2.executeUpdate(sql_update);
https://stackoverflow.com/questions/69163511/build-was-configured-to-prefer-settings-repositories-over-project-repositories-b
You can add jitpack.io as a repository inside dependencyResolutionManagement in settings.gradle
dependencyResolutionManagement {
    repositoriesMode.set(RepositoriesMode.FAIL_ON_PROJECT_REPOS)
    repositories {
        google()
        mavenCentral()
        maven { url 'https://jitpack.io' }
    }
}
https://stackoverflow.com/questions/60506895/android-studio-3-6-1-error-this-project-uses-androidx-dependencies
The Android Gradle plugin provides the following global flags that you can set in your gradle.properties file:
android.useAndroidX: When set to true, this flag indicates that you want to start using AndroidX from now on. If the flag is absent, Android Studio behaves as if the flag were set to false.
android.enableJetifier: When set to true, this flag indicates that you want to have tool support (from the Android Gradle plugin) to automatically convert existing third-party libraries as if they were written for AndroidX. If the flag is absent, Android Studio behaves as if the flag were set to false.
To enable jetifier, add those two lines to your gradle.properties file:
android.useAndroidX=true
android.enableJetifier=true
on terminal
curl --output 055022913.pdf https://yourwebsite/PDF/2021/055022913.pdf
https://unix.stackexchange.com/questions/428747/restrict-graphic-tablet-to-primary-display
xinput # get the IDs for all relevant pieces of my tablet. xrandr # get the names of my displays xinput map-to-output 13 HDMI-A-0
xinput map-to-output 14 HDMI-A-0 xinput map-to-output 21 VGA-1
One of the top things after installed a virtual machine via VirtualBox is how to transfer files between host OS and guest OS. And this can be done via Shared Folder feature.
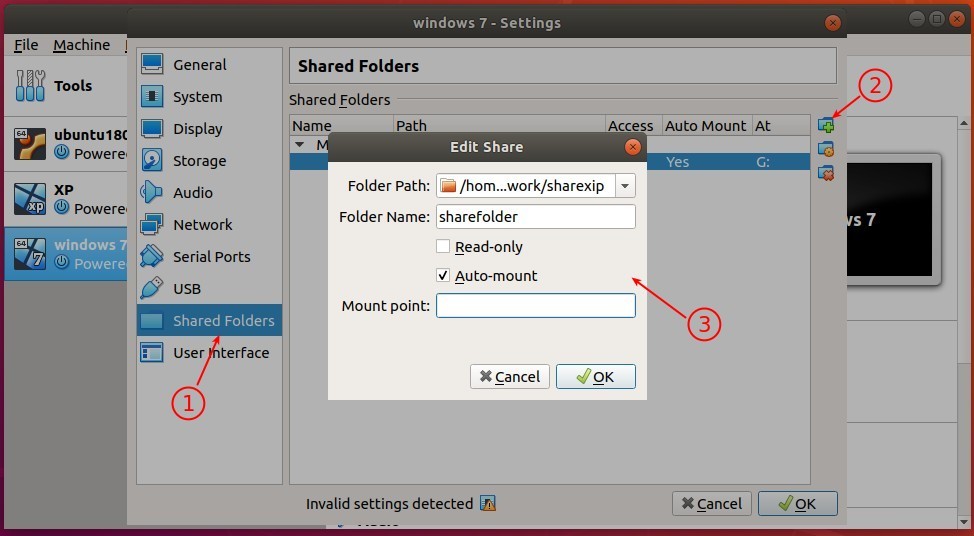
1. In Virtualbox (6.0.8 in the case), open Settings of the Windows Guest OS. Then do:
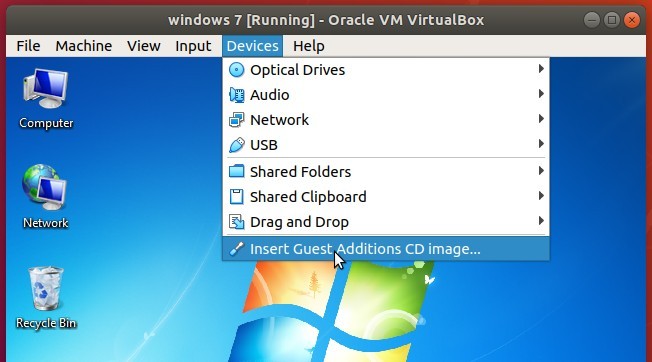
2. Boot up the Guest OS (Windows 7 in the case), and then go to menu Devices -> Insert Guest Additions CD image.
If you don’t see the Guest window menu, press right-Ctrl + C on keyboard.
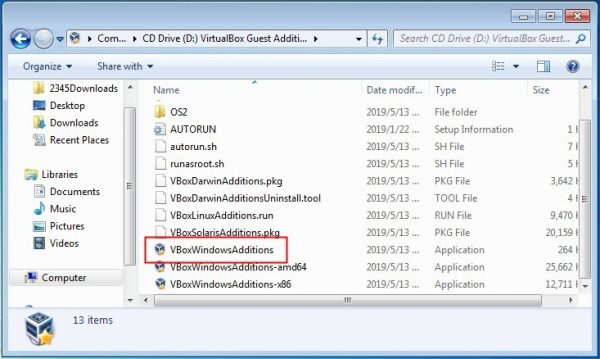
3. Open Computer, you’ll see CD Driver marked as ‘VirtualBox Guest’.
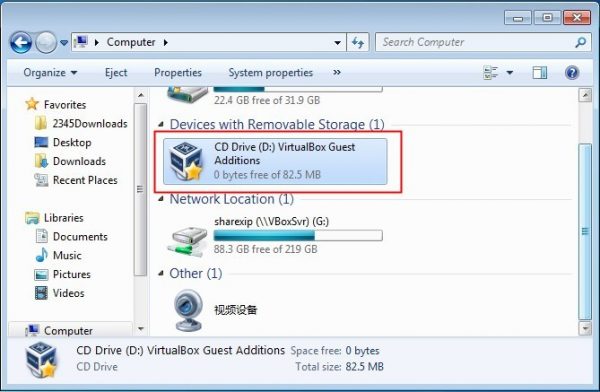
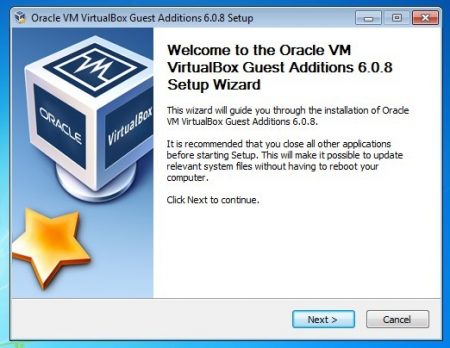
4. Go to the CD Driver and click install the exe file to bring up guest addition install wizard.
5. Follow the install wizard until done.
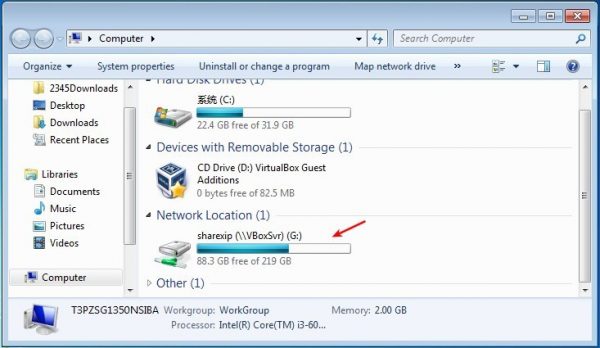
6. Finally reboot the Windows guest OS, and shared folder should be there in ‘Computer’
Si queremos hacer nuestra propia biblioteca de funciones para poder reutilizar funciones en diferentes proyectos, básicamente, seria crear nuestro propio DDL.
Crearemos un proyecto normal con Visual Studio, llamarlo como queráis.
Creamos una clase llamada Funciones y meteremos lo siguiente:
1 2 3 4 5 6 7 8 9 10 11 12 | public static int suma(int a, int b){ return a + b;}public static void mostrarArray(int[] array){ for (int i=0; i<array.Length ;i++) { Console.WriteLine(array[i]); }} |
Una vez que lo tengas, simplemente, debemos compilar nuestra biblioteca.

Si todo se hizo bien, se debería crear el .ddl en la carpeta bin/Debug del proyecto.

Con eso estaría nuestra biblioteca, ahora crearemos otro proyecto y en Proyecto -> Agregar referencia…
Y en Examinar elegimos la ruta donde tengamos el ddl creado.

En el fichero Program.cs, poner lo siguiente:
1 2 3 4 5 6 7 8 9 10 11 12 13 14 15 16 17 18 19 20 21 22 23 24 | using System;using System.Collections.Generic;using System.Linq;using System.Text;using System.Threading.Tasks;using BibliotecaDDR;namespace test_biblioteca{ class Program { static void Main(string[] args) { Console.WriteLine(Funciones.suma(5, 6)); int[] valores = { 1, 2, 3, 4, 5 }; Funciones.mostrarArray(valores); Console.ReadLine(); } }} |
Fijaros que debemos usar esta linea using BibliotecaDDR;
Este es el resultado:

https://www.discoduroderoer.es/como-hacer-tu-propia-biblioteca-de-funciones-en-c-sharp/
#move only 20000 | no sort
find ~/PDF/FOLDER_1 "*.pdf" -type f | head -20000 |xargs mv -t ~/PDF/FOLDER_5
Here's a TL;DR quick start version of the package creating tutorial. Follow these steps to create a simple package.
Problem? Read the detailed version: Creating Chocolatey Packages
nuspec file. This defines the package. (Docs)choco new -h will get you started seeing options available to you.cd package-namepackage-name.nuspec configuration file../tools/chocolateyInstall.ps1 install script.
choco install ussfchoco pack
choco install package-name -s . (package-name is the id element in the nuspec)choco apikey -k [API_KEY_HERE] -source https://push.chocolatey.org/choco push package-name.1.1.0.nupkg -s https://push.chocolatey.org/ - nupkg file can be ommitted if it is the only one in the directory.- e.g. classic-shell. Yes, we realize there are a lot of older packages not following this convention.%ChocolateyInstall% - Chocolatey installation directory%ChocolateyInstall%\lib\package-name - Package directory%cd% or $pwd - current directorychoco new or online.Here are some simple examples.
📝 NOTE This needs updated with checksums and newer package concepts. Please run
choco newwhen creating packages as it contains all of the most up to date notes.
📝 NOTE You have to figure out the command line switch to make the installer silent, e.g. /VERYSILENT. This changes from installer to installer.
📝 NOTE Please maintain compatibility with Posh v2. Not every OS we support is on Posh v2 (nor comes OOB with Posh v3+). It's best to work with the widest compatibility of systems out there.
For a complete example of how you can use the PackageParameters argument of the choco install command, see this How-To.
choco install ussf.
https://docs.chocolatey.org/en-us/create/create-packages-quick-start
The compare plugin assumes that you want to compare an old version of your work versus the new version. Open any two files (A, B) in Notepad++, which you want to compare. File B (new) gets compared to File A (old).
Then, navigate to Plugins > Compare Menu > Compare.
It shows the difference/comparison side by side, as shown in the screenshot. You can set any open file as the default. Simply click Compare > Set as First to Compare. Choose this selected file to compare it with other ones in whatever mode you decide.
https://www.makeuseof.com/tag/notepad-compare-two-files-plugin/#:~:text=Open%20any%20two%20files%20(A,as%20shown%20in%20the%20screenshot.
