martes, 21 de diciembre de 2021

How to export a MS SQL Server database to a SQL script (database to sql file) with Microsoft SQL Server

Generating .sql file of your database with data

SQL Server Management Studio provides the ability to generate scripts for creating databases, tables, stored procedures, functions, views and inserting data. For smaller amounts of data, this method can be used to send table structures and/or data to Scribe Support for testing purposes.

To proceed, Open SSMS and access the database engine with the default Windows authentication (or from the connection that you want to access):

SQL Server Management Studio SSMS Login

Connect to the server and explore the databases in the object explorer. In our case, we want to export the my_database database, that, as you can see, is available in the Databases directory:

SQL Server Management Studio Database Viewer 

Do right click on the database and select Tasks and then on Generate Scripts:

Generate Scripts SQL Server

This will open the Generate and Publish Scrips dialog. As first step, define which tables of the database you want to export, optionally you can script the entire database and objects:

Export Tables MS SQL Server Management Studio

After confirm which tables do you want to export, proceed to define if you want a single file per table or everything in a single file. If you go to the advanced scripting options, you can define the types of data to script, this means if you want to include the data on the file directly or only the structure of the database:

SQL Server Export Data and Structure

Finally, the export will begin and you will see the success message at the end:

Success SQL Server Script Structure and Data Export


https://ourcodeworld.com/articles/read/846/how-to-export-a-ms-sql-server-database-to-a-sql-script-database-to-sql-file-with-microsoft-sql-server-management-studio-17

sábado, 4 de diciembre de 2021

SQL Dump File Splitter

 https://www.rusiczki.net/2007/01/24/sql-dump-file-splitter/

Scenario: You are a conscious user and you back up your site’s database every once in a while. And you sit smiling and content knowing that your precious data is safe. Just to discover after disaster strikes that you can’t restore the contents of the SQL dump file because of upload size limitations or because phpMyAdmin would run out of memory while decompressing the gzip / zip file.

In these cases there are two solutions at hand: if you have console access you can login and import the plain SQL file (which you previously uploaded via FTP) by typing a command like “mysql -uusername -ppassword < dumpfile.sql” or if you only have access to phpMyAdmin you can open up a text editor and split the SQL file into smaller parts that can be uploaded sequentially. The problem si that if you have a larger dump file this can be a reeeaaaly time consuming job.

Today I encountered a problem like this. And since I had no console access and I was in no mood to lose a few precious hours splitting up a 40 meg file by hand I googled for “sql splitter” and I found a program called SQLDumpSplitter 2. Unfortunately the author’s site was not working (and since I don’t know any German I couldn’t really figure out why) but I found an alternative download on a dutch web developer forum. And since that forum required to be a member to be able to download I thought I should offer yet another alternative download location without all those registration related mini headaches. Here on this site…

SQLDumpSplitter 2

So here it is ladies and gentlemen: download SQLDumpSplitter 2 (or zip compressed). All credits for writing this program go to Philip Lehmann-Böhm (http://www.philiplb.de).

Slip sql files

 https://mastergt68.wordpress.com/2013/03/14/muy-buena-utilidad-para-hacer-split-de-archivos-sql/


Recientemente, tuve la necesidad de cargar un poco más de 187,000 archivos hacia SQL Server 2008 R2 SP2. Pues nada, abrir el archivo con extensión SQL desde el SQL Server Management Studio y listo. No señor; error.

Error SSMS

Bueno, habrá que hacer “split” o división en varios archivos. Yo tenía presente que en SSMS el editor de queries aguanta unas 10,000 entradas, así que procedí a ubicar un programa que me ayudase con la división y me encontré con GSplit.

Este es un programa gratuito que permite, con diversas condiciones, dividir un archivo grande en varios relacionados, que es justo lo que necesito.

Al abrir el programa, luego de descargarlo e instalarlo obviamente, se encuentra uno con esta pantalla:

GSplit 1

El programa es fácil de manejar y solo hay que indicar el archivo original, la carpeta destino y la manera en la cual las “piezas” se generarán. En mi caso en particular, definí dichas piezas de esta manera:

GSplit 2

Y en tipo y tamaño, especifiqué lo siguiente:

GSplit 3

Importante, revisar en “Other Properties” para dejarla así:

GSplit 4

Luego de esto, van al link “Split File!” y presionan Split!:

GSplit 5

Asegurense de incrementar el tamaño del buffer; en mi caso, lo dejé en 256 KB.

Luego de algunos segundos, aparece esta ventana indicando que el proceso fue exitoso:

GSplit 6

viernes, 12 de noviembre de 2021

nuget.psm1 porque la ejecución de scripts está deshabilitada en este sistema.

 'Abrimos el Windows PowerShell como administrador y ejecutamos:'


Get-ExecutionPolicy


'Nos tendría que devolver «restricted». (Restringido)'
'Para cambiar esta configuración basta con ejecutar:'


Set-ExecutionPolicy Unrestricted


https://www.codegrepper.com/code-examples/shell/Habilitar+la+ejecuci%C3%B3n+de+scripts+para+Powershell

jueves, 11 de noviembre de 2021

SQL SERVER procedure Buscar


CREATE procedure dbo.buscar

@Desc            VARCHAR(255)

,@Tipo            VARCHAR(2)


AS


BEGIN 


    IF UPPER(@Tipo) = 'T'

    BEGIN

        SELECT 

            NAME

        FROM  

            SYSOBJECTS 

        WHERE

            ID IN (SELECT 

                    ID 

                FROM 

                    SYSCOMMENTS 

                WHERE 

                    TEXT LIKE ('%' + @Desc + '%')

                )

        ORDER BY 

            NAME

    END


    IF UPPER(@Tipo) = 'C'

    BEGIN

        SELECT 

            NAME

        FROM  

            SYSOBJECTS 

        WHERE

            ID IN (SELECT 

                    ID 

                FROM 

                    SYSCOLUMNS 

                WHERE 

                    NAME LIKE ('%' + @Desc + '%')

                )

        ORDER BY 

            NAME

    END


    SELECT

        NAME

    FROM

        SysObjects 

WHERE

        xType = @Tipo

        AND

        name like ('%' + @Desc + '%')

    ORDER BY 

        NAME

END        


Saber que Jobs estan en ejecucion SQL SERVER


SELECT

j.name AS 'Nombre del Job',

ja.start_execution_date AS 'Inicio a las:',

Datediff(ss, ja.start_execution_date, Getdate()) AS 'Ha corrido por: (Segundos)'

FROM   msdb.dbo.sysjobactivity ja

INNER JOIN msdb.dbo.sysjobs J

ON j.job_id = ja.job_id

WHERE  job_history_id IS NULL

AND ja.start_execution_date IS NOT NULL

ORDER  BY start_execution_date

Convertir String a DateTime C#


string date = "01/08/2008";
DateTime dt = Convert.ToDateTime(date);           
Console.WriteLine("Year: {0}, Month: {1}, Day: {2}", dt.Year, dt.Month, dt.Day);

Ejemplo obtener programas instalados en pc cmd

WMIC  /output:C:\appsinstaladas.txt product get name,version

lunes, 1 de noviembre de 2021

How to convert DateTime to VarChar

DECLARE @now datetime
SET @now = GETDATE()
select convert(nvarchar(MAX), @now, 0) as output, 0 as style 
union select convert(nvarchar(MAX), @now, 1), 1
union select convert(nvarchar(MAX), @now, 2), 2
union select convert(nvarchar(MAX), @now, 3), 3
union select convert(nvarchar(MAX), @now, 4), 4
union select convert(nvarchar(MAX), @now, 5), 5
union select convert(nvarchar(MAX), @now, 6), 6
union select convert(nvarchar(MAX), @now, 7), 7
union select convert(nvarchar(MAX), @now, 8), 8
union select convert(nvarchar(MAX), @now, 9), 9
union select convert(nvarchar(MAX), @now, 10), 10
union select convert(nvarchar(MAX), @now, 11), 11
union select convert(nvarchar(MAX), @now, 12), 12
union select convert(nvarchar(MAX), @now, 13), 13
union select convert(nvarchar(MAX), @now, 14), 14
--15 to 19 not valid
union select convert(nvarchar(MAX), @now, 20), 20
union select convert(nvarchar(MAX), @now, 21), 21
union select convert(nvarchar(MAX), @now, 22), 22
union select convert(nvarchar(MAX), @now, 23), 23
union select convert(nvarchar(MAX), @now, 24), 24
union select convert(nvarchar(MAX), @now, 25), 25
--26 to 99 not valid
union select convert(nvarchar(MAX), @now, 100), 100
union select convert(nvarchar(MAX), @now, 101), 101
union select convert(nvarchar(MAX), @now, 102), 102
union select convert(nvarchar(MAX), @now, 103), 103
union select convert(nvarchar(MAX), @now, 104), 104
union select convert(nvarchar(MAX), @now, 105), 105
union select convert(nvarchar(MAX), @now, 106), 106
union select convert(nvarchar(MAX), @now, 107), 107
union select convert(nvarchar(MAX), @now, 108), 108
union select convert(nvarchar(MAX), @now, 109), 109
union select convert(nvarchar(MAX), @now, 110), 110
union select convert(nvarchar(MAX), @now, 111), 111
union select convert(nvarchar(MAX), @now, 112), 112
union select convert(nvarchar(MAX), @now, 113), 113
union select convert(nvarchar(MAX), @now, 114), 114
union select convert(nvarchar(MAX), @now, 120), 120
union select convert(nvarchar(MAX), @now, 121), 121
--122 to 125 not valid
union select convert(nvarchar(MAX), @now, 126), 126
union select convert(nvarchar(MAX), @now, 127), 127
--128, 129 not valid
union select convert(nvarchar(MAX), @now, 130), 130
union select convert(nvarchar(MAX), @now, 131), 131
--132 not valid
order BY style

 https://stackoverflow.com/questions/74385/how-to-convert-datetime-to-varchar

viernes, 22 de octubre de 2021

Install GitBucket


 1. Login to your VPS via SSH

ssh user@vps_IP

2. Update the system and install necessary packages

[user]$ sudo apt-get update && sudo apt-get -y upgrade
[user]$ sudo apt-get install software-properties-common git nano wget

3. Install Java 8

To add the webupd8team repository to your sources list and install the latest Oracle Java 8 JDK, run the following commands:

[user]$ sudo add-apt-repository ppa:webupd8team/java
[user]$ sudo apt-get update
[user]$ sudo apt-get install oracle-java8-installer

To check if JAVA has been properly installed on your Ubuntu 16.04 VPS run java -version, and the output should be similar to the following:

[user]$ java -version
java version "1.8.0_101"
Java(TM) SE Runtime Environment (build 1.8.0_101-b13)
Java HotSpot(TM) 64-Bit Server VM (build 25.101-b13, mixed mode)

4. Install GitBucket

Create a new GitBucket user:

[user]$ sudo adduser --gecos 'Gitbucket User' gitbucket

GitBucket will store all the git repositories in the home directory of the user who will launch the application.

Download latest gitbucket.war from Github. At the time of writing, the latest version is version 4.4.

[user]$ sudo wget -O /home/gitbucket/gitbucket.war https://github.com/gitbucket/gitbucket/releases/download/4.4/gitbucket.war
[user]$ sudo chown -R gitbucket: /home/gitbucket

5. Create systemd service

To create a new systemd service for GitBucket, open your editor of choice and create a new file:

[user]$ sudo nano /etc/systemd/system/gitbucket.service

and add the following code lines:

[Unit]
Description=GitBucket service
After=syslog.target
After=network.target

[Service]
User=gitbucket
ExecStart=/usr/bin/java -jar /home/gitbucket/gitbucket.war --port=8080 --host=127.0.0.1

[Install]
WantedBy=multi-user.target

Start the GitBucket server and set it to start automatically on boot:

[user]$ sudo systemctl enable gitbucket.service
[user]$ sudo systemctl start gitbucket.service

To verify the unit started, run systemctl status gitbucket.service and you should see something like below:

● gitbucket.service - GitBucket service
   Loaded: loaded (/etc/systemd/system/gitbucket.service; enabled; vendor preset: enabled)
   Active: active (running) since Fri 2016-09-09 18:25:18 CDT; 2s ago
 Main PID: 3578 (java)
   CGroup: /system.slice/gitbucket.service
           └─3578 /usr/bin/java -jar /home/gitbucket/gitbucket.war --port=8080 --host=127.0.0.1

6. Install and configure Nginx

To install the latest stable version of Nginx available on the Ubuntu repositories, run:

[user]$ sudo apt-get -y install nginx

Generate a self signed ssl certificate:

[user]$ sudo mkdir -p /etc/nginx/ssl
[user]$ cd /etc/nginx/ssl
[user]$ sudo openssl genrsa -des3 -passout pass:x -out gitbucket.pass.key 2048
[user]$ sudo openssl rsa -passin pass:x -in gitbucket.pass.key -out gitbucket.key
[user]$ sudo rm gitbucket.pass.key
[user]$ sudo openssl req -new -key gitbucket.key -out gitbucket.csr
[user]$ sudo openssl x509 -req -days 365 -in gitbucket.csr -signkey gitbucket.key -out gitbucket.crt

[user]$ sudo openssl dhparam -out /etc/nginx/ssl/dhparam.pem 2048
If you don’t want to get warnings associated with self-signed SSL Certificates, you can purchase a trusted SSL certificate here.

Next, create a new Nginx server block:

[user]$ sudo nano /etc/nginx/sites-available/myGitbucket.com
server {
    listen 443 ssl http2;
    server_name myGitbucket.com;

    location / {
        proxy_pass              http://127.0.0.1:8080;
        proxy_set_header        Host $host;
        proxy_set_header        X-Real-IP $remote_addr;
        proxy_set_header        X-Forwarded-For $proxy_add_x_forwarded_for;
        proxy_connect_timeout   150;
        proxy_send_timeout      100;
        proxy_read_timeout      100;
        proxy_buffers           4 32k;
        client_max_body_size    500m; # Big number is we can post big commits.
        client_body_buffer_size 128k;
    }

    ssl on;
    ssl_certificate     /etc/nginx/ssl/gitbucket.crt;
    ssl_certificate_key /etc/nginx/ssl/gitbucket.key;
    ssl_dhparam  /etc/nginx/ssl/dhparam.pem;

    ssl_session_timeout 5m;
    ssl_ciphers  EECDH+CHACHA20:EECDH+AES128:RSA+AES128:EECDH+AES256:RSA+AES256:EECDH+3DES:RSA+3DES:!MD5;
    ssl_protocols TLSv1 TLSv1.1 TLSv1.2;
    ssl_prefer_server_ciphers on;

    access_log  /var/log/nginx/mygitbucket.access.log;
    error_log   /var/log/nginx/mygitbucket.error.log;

}

server {
    listen      80;
    server_name myGitbucket.com;

    add_header Strict-Transport-Security max-age=2592000;
    rewrite ^ https://$server_name$request_uri? permanent;
}

Activate the server block by creating a symbolic link :

[user]$ sudo ln -s /etc/nginx/sites-available/myGitbucket.com /etc/nginx/sites-enabled/myGitbucket.com

Test the Nginx configuration and restart nginx:

[user]$ sudo nginx -t
[user]$ sudo systemctl start nginx

Open http://myGitbucket.com/ in your favorite web browser and you should see the GitBucket home page. The default username and password are both root.

https://www.rosehosting.com/blog/install-gitbucket-on-ubuntu-16-04/

miércoles, 20 de octubre de 2021

2D Animation package - PSB workaround?

 convert ***.psd ***.psb

https://forum.unity.com/threads/2d-animation-package-psb-workaround.619435/


I spent last four hours trying to find any solution, and actually did. Yay!

https://imagemagick.org/script/download.php

Use from command line like this:

magick convert base.psd base.psb

(replace 'base.psd' with the name of your psd file, obviously)

Worked for image exported as .psd from Gimp 2.10.8

Hope this helps. GLHF 


https://linuxize.com/post/install-rpm-packages-on-ubuntu/

Install Alien

Alien is a tool that supports conversion between Red Hat rpm, Debian deb, Stampede slp, Slackware tgz, and Solaris pkg file formats.

Before installing the alien package, make sure the Universe repository is enabled on your system:

sudo add-apt-repository universe

Once the repository is enabled, update the packages index and install the alien package with:

sudo apt update sudo apt install alien

The command above will also install the necessary build tools.

Converting and Installing an RPM package

To convert a package from RPM to DEB format, use the alien command followed by the RPM package name:

sudo alien package_name.rpm

Depending on the package size, the conversion may take some time. In most cases, you will see warning messages printed on your screen. If the package is successfully converted, the output will indicate that the DEB package is generated:

package_name.deb generated

To install the deb package , you can either use the dpkg or apt utility:

sudo dpkg -i package_name.deb
sudo apt install ./package_name.deb
The package should now be installed, assuming it’s compatible with your system, and all dependencies are met.


lunes, 18 de octubre de 2021

PDF-Editor

 https://icecreamapps.com/es/PDF-Editor/


Set Mail SQL SERVER

 We can send an email using the SQL Server. Database mail configuration information is maintained in an MSDB database. It is supporting logging and auditing features, using system tables of MSDB. We can send mail as a text message, HTML, query results, and files as an attachment. We have to follow some simple steps to achieve this.

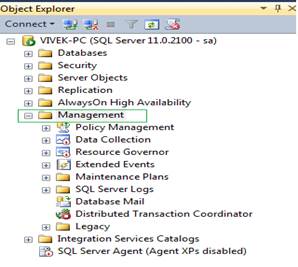
Step 1. Go to Object Explorer.

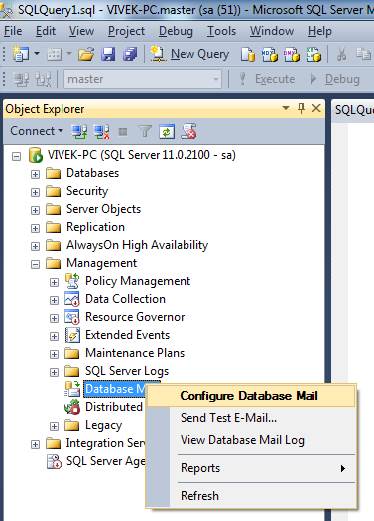
Step 2. Expand the management menu, as shown below:

menu

Step 3. Right-click on database mail and select configure database mail, as shown below.

Configure Database Mail

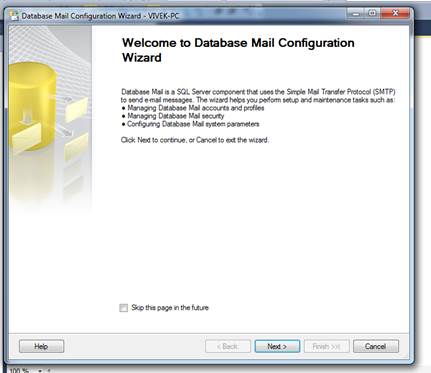
After selecting “Configure Database Mail”, we will get the screenshot as shown below:

Configure Database Mail

Step 4. Click the Next button and after clicking the next button; we will get a new screenshot, as shown below.

Next

Step 5. Select the Radio button on the first option “Set up Database Mail by performing the following tasks” and click the Next button.

We will get a new Screen for setting up the account details for configuring the mail.

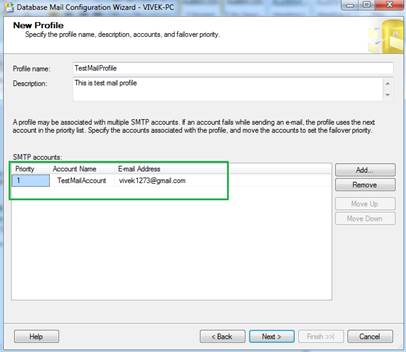
Step 6. Enter "Profile name" and "Description", as shown below:

Profile

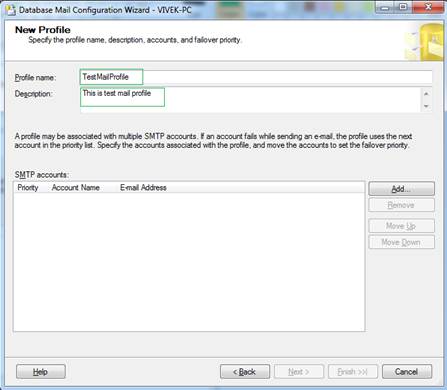
Step 7. Click ADD button and we will get a new prompt where we can add more details related to the mail setup, as shown below:

  • Account name Enter the name of your new account.
  • Description Enter a description for the account. It is optional.
  • E-mail address Enter your e-mail address, which we will use for sending an e-mail, here you can specify your domain email id also as email@yourDomain.com.
  • Display name Enter the name which will use for displaying the name of the sender and it is optional.
  • Reply e-mail Enter the reply e-mail address, which will use for replies to e-mail messages sent from this account. It is also optional.
  • Server name Enter the IP address of the SMTP server for your e-mail account.
    This server requires a secure connection (SSL) - checked or unchecked as per your e-mail Domain.
  • SMTP Authentication We have to choose one Authentication type among three Authentication types.
    Here, I am using my Gmail account credentials to configure the mail setup. In most cases, we are using a company account.

    new

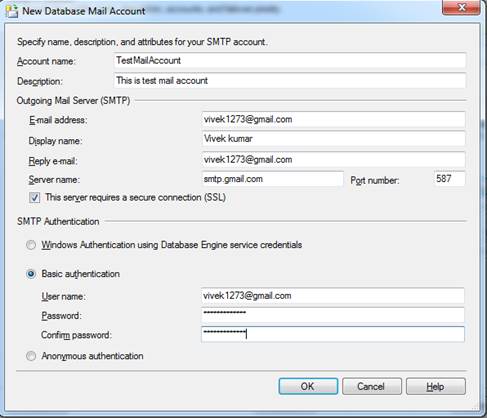
Step 8. Click OK. This screen will close and the previous screen is shown below.

new

Step 9. Click Next and we will get the prompt.

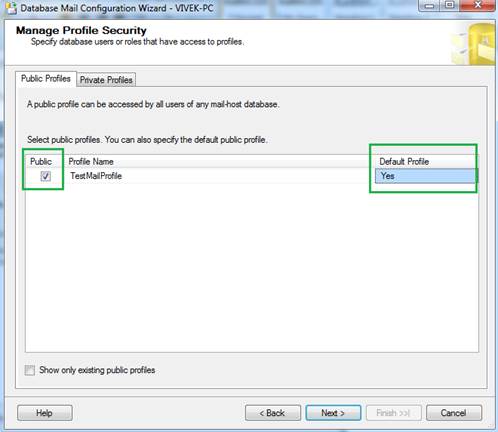
Step 10. Check the checkbox on “TestMailProfile” and make it the default profile, as shown below.

TestMailProfile

Step 11. Click Next and we will get a new screen.

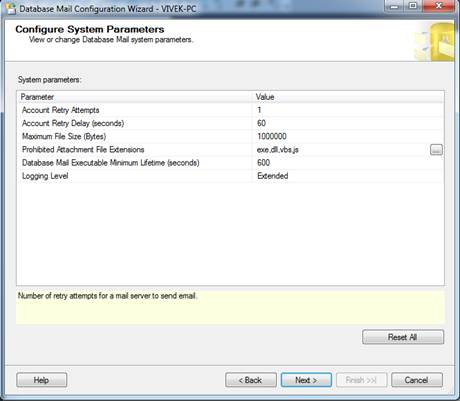
Step 12. Keep the default setting for the system parameters and click the Next button, as shown below:

default setting

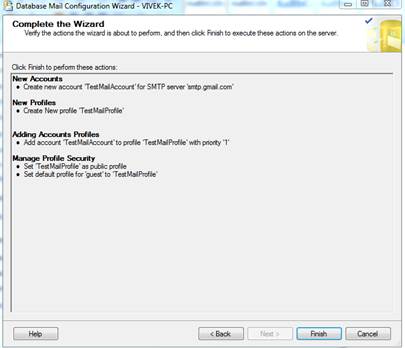
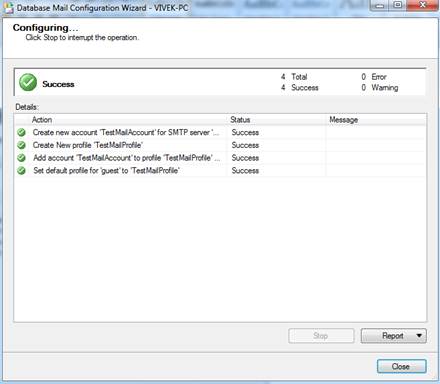
Step 13. Click the Finish button to complete the configuration, as shown below.

Finish

Step 14. It will do all the configurations and then click the close button.

configurations

Now, we are done with the mail configuration. We will test this to send a sample mail, with the help of the following steps.

Step 1. Go to Object Explore

Step 2. Expand the “Management” menu

Step 3. Right Click “Database Mail”

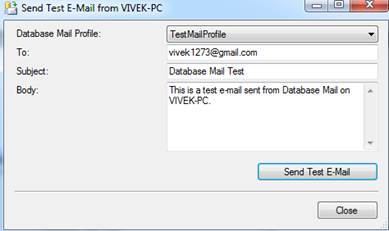
Step 4. Click “send Test E-Mail”, as shown below.

send Test E-Mail

After clicking “send Test E-Mail”, we will get a new screen.

Step 5. Database Mail Profile: Select “TestMailProfile”, as we created just now.

  • To Enter an e-mail Id of the receiver
  • Subject Enter the subject of your e-mail.
  • Body Enter the content of your mail.

Click the “Send Test E-mail” button, as shown below.

Send Test E-mail

An email will be sent to the recipient successfully.

After successfully configuring the Email in the SQL server, we will see how to send Email programmatically, with the help of a system procedure.

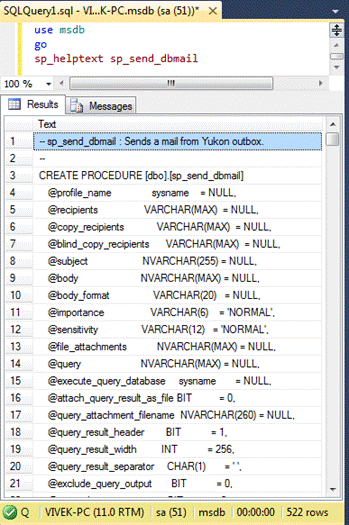
We are using the system procedure “sp_send_dbmail” to send an E-mail.

We can see the “sp_send_dbmail” system procedure by using “sp_helptext sp_send_dbmail”

The query will be written as shown below.

Query

We will send the parameters to the “sp_send_dbmail” system procedure, as per our requirement.

Here, I am using the parameters shown below to send an E-mail. 

use msdb
go
EXEC msdb.dbo.sp_send_dbmail
@profile_name = 'TestMailProfile',
@recipients = '',
@subject = 'DataBase Mail Test',
@body = 'This is a test e-mail.';
SQL

Explanation

  • Profile name We have to write the profile name which we created now.
  • Recipients we have to write the recipient's email. We can write multiple recipients' e-mail id by separating with ‘;’
  • Subject  We have to write the subject of the e-mail.
  • Body We have to write the body of the e-mail

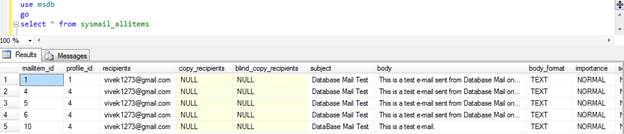
We can also verify our E-mail status, whether it will successfully send or not, and get other information using the query given below:

use msdb
go
select * from sysmail_allitems
SQL

query

We can also see the database mail log, as shown below.

Mail Log

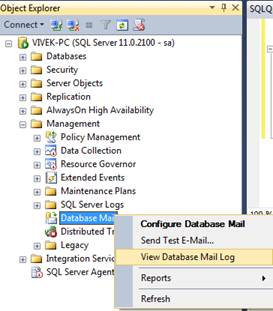
After clicking “View database Mail Log”, we will get the information about the database mail log, as shown below.

View database Mail Log


https://www.c-sharpcorner.com/article/configure-database-mail-send-email-from-sql-server-database/

https://www.c-sharpcorner.com/article/configure-database-mail-send-email-from-sql-server-database/