How to Run C# in VSCode
1. Install .NET 5.0
First, install .NET 5.0. You can do that here:
https://dotnet.microsoft.com/download
Then confirm that dotnet is installed by checking the version in a terminal window:
dotnet --version
# 5.0.202 (or whatever version yours is)
Also go ahead and install this C# VSCode extension.
2. Create a new C# project in VSCode
Next, create a new project and open it in VSCode:
dotnet new console -o app
cd app
code . # to open project in VSCode
Now you should see a simple Hello World app with the main code in Program.cs
3. Run Your C# Code in VSCode
To execute your code, simply run:
dotnet run…and you should see Hello World displayed in the console.
4. Debug Your C# Code in VSCode
First, be sure you installed the official C# extension mentioned above. If not, it can be found here.
Next, in VSCode open the Command Palette by going to View > Command Palette (or use the shortcut if you know what it is), and search for .NET: Generate Assets for Build and Debug
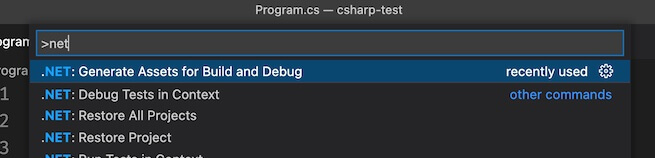
Choosing this will generate a .vscode folder with a prepopulated build configuration in it.
Now go to the “Run and Debug” tab in VSCode, set your breakpoint(s), and click the Play button to debug.

5. Compile Your Code
To compile your code, run:
dotnet buildAfter that is done you will have an executable (exe or dll) in your /bin folder. Depending on your build configuration it may be in a Debug folder or a Release folder.
No hay comentarios:
Publicar un comentario