jueves, 14 de octubre de 2021

How to Search a Single Domain


Usually searching an entire domain casts too wide a net, but if you are searching for government information, for example, you could search just within .gov sites by entering only the domain for the name. For example:

site:.gov seized property ohio

This site search is confined to all the websites in the .gov domain.

If you know the specific government agency, it is better to add it to filter your results further. For example, if you seek tax information results only from the IRS website, use:

site:IRS.gov estimated taxes


jueves, 9 de septiembre de 2021

MySQL error code: 1175 during UPDATE in MySQL Workbench

SET SQL_SAFE_UPDATES = 1;

UPDATE  ERP.table_01 set id = '00000000-0000-0000-0000-000000000000' ;


https://stackoverflow.com/questions/11448068/mysql-error-code-1175-during-update-in-mysql-workbench

sábado, 4 de septiembre de 2021

mysql query email

mysql -u USER -pPASSWORD my_DB_schema -e "select * from table" | mail -s "message header" my_mail_for_spam@gmail.com >/dev/null 2>&1


# https://unix.stackexchange.com/questions/397745/mysql-query-formatting-in-email

jueves, 2 de septiembre de 2021

sync folders outside of the OneDrive folder

 on cmd

mklink /D "<path-to-onedrive>\<name-of-new-folder>;" "<path-to-folder-to-be-synced>"

https://www.soliva.es/como-agregar-y-sincronizar-carpetas-fuera-de-la-carpeta-de-onedrive/

miércoles, 25 de agosto de 2021

EXCEL export html table


 <button id="btnExport" onclick="fnExcelReport();"> EXPORT </button>

function fnExcelReport()
{
    var tab_text="<table border='2px'><tr bgcolor='#87AFC6'>";
    var textRange; var j=0;
    tab = document.getElementById('headerTable'); // id of table

    for(j = 0 ; j < tab.rows.length ; j++) 
    {     
        tab_text=tab_text+tab.rows[j].innerHTML+"</tr>";
        //tab_text=tab_text+"</tr>";
    }

    tab_text=tab_text+"</table>";
    tab_text= tab_text.replace(/<A[^>]*>|<\/A>/g, "");//remove if u want links in your table
    tab_text= tab_text.replace(/<img[^>]*>/gi,""); // remove if u want images in your table
    tab_text= tab_text.replace(/<input[^>]*>|<\/input>/gi, ""); // reomves input params

    var ua = window.navigator.userAgent;
    var msie = ua.indexOf("MSIE "); 

    if (msie > 0 || !!navigator.userAgent.match(/Trident.*rv\:11\./))      // If Internet Explorer
    {
        txtArea1.document.open("txt/html","replace");
        txtArea1.document.write(tab_text);
        txtArea1.document.close();
        txtArea1.focus(); 
        sa=txtArea1.document.execCommand("SaveAs",true,"Say Thanks to Sumit.xls");
    }  
    else                 //other browser not tested on IE 11
        sa = window.open('data:application/vnd.ms-excel,' + encodeURIComponent(tab_text));  

    return (sa);
}


https://qastack.mx/programming/22317951/export-html-table-data-to-excel-using-javascript-jquery-is-not-working-properl

miércoles, 18 de agosto de 2021

How to call one shell bash from another shell bash?

    #!/bin/bash

    echo "This script is about to run another script."

sh ./script.sh
echo "This script has just run another script."
https://stackoverflow.com/questions/8352851/how-to-call-one-shell-script-from-another-shell-script

jueves, 12 de agosto de 2021

Linux Bash Loop with mysql

 #!/bin/bash

# sh_my_bach_run_this_loop.sh

for i in {1..5}

do

mysql -u USER -pPASSWORD -e "  delete from table where id = $i ;"

   echo "Welcome $i times"

done


... 

# add permission, run this on terminal

sudo chmod +x sh_my_bach_run_this_loop.sh

# run this on terminal

./sh_my_bach_run_this_loop.sh

miércoles, 11 de agosto de 2021

remove first character first line sed -i linux

Sed stands for Stream Editor which parses text files and used for making textual transformations to a file. 

The command specified to Sed, is applied on the file line by line. 

sed [options]\'{command}\' [ file name] 

sed -i \'s/{old value}/{new value}/\'  [ file name ]


 #!/bin/bash


# current date;

today=`date '+%Y%m%d'`;


# replace 60 first character from string on file with a " ;

sed -i 's/............................................................./,\"/g' list_$today.txt;


# replace '.pdf' from string on file with a " ;

sed -i 's/\.pdf/\"/g' list_$today.txt;


# replace " with ';

sed -i "s/\"/'/g"  list_$today.txt;


# remove first character first line on file;

sed -i '1s/^.//'  list_$today.txt;


# update info with the file modified

mysql -u USER -pPASSWORD DATABASE -e "


UPDATE TABLE_1 SET pdf= 1 WHERE folio in ($( cat list_$today.txt )) and pdf = '';

UPDATE TABLE_2 SET pdf= 1 WHERE folio in ($( cat list_$today.txt )) and pdf = '';


"


viernes, 6 de agosto de 2021

sudo crontab -e

One of the challenges (among the many advantages) of being a sysadmin is running tasks when you'd rather be sleeping. For example, some tasks (including regularly recurring tasks) need to run overnight or on weekends, when no one is expected to be using computer resources. I have no time to spare in the evenings to run commands and scripts that have to operate during off-hours. And I don't want to have to get up at oh-dark-hundred to start a backup or major update.

The crond daemon is the background service that enables cron functionality.

systemctl status cron


sudo crontab -e

# crontab -e

SHELL=/bin/bash
MAILTO=root@example.com
PATH=/bin:/sbin:/usr/bin:/usr/sbin:/usr/local/bin:/usr/local/sbin

# For details see man 4 crontabs

# Example of job definition:
# .---------------- minute (0 - 59)
# |  .------------- hour (0 - 23)
# |  |  .---------- day of month (1 - 31)
# |  |  |  .------- month (1 - 12) OR jan,feb,mar,apr ...
# |  |  |  |  .---- day of week (0 - 6) (Sunday=0 or 7) OR sun,mon,tue,wed,thu,fri,sat
# |  |  |  |  |
# *  *  *  *  * user-name  command to be executed

# backup using the rsbu program to the internal 4TB HDD and then 4TB external
01 01 * * * /usr/local/bin/rsbu -vbd1 ; /usr/local/bin/rsbu -vbd2

# Set the hardware clock to keep it in sync with the more accurate system clock
03 05 * * * /sbin/hwclock --systohc

# Perform monthly updates on the first of the month
# 25 04 1 * * /usr/bin/dnf -y updat

grep CRON /var/log/syslog
sudo chmod +x filename.bin

 https://opensource.com/article/17/11/how-use-cron-linux

jueves, 5 de agosto de 2021

npm ERR! electron@12.0.11 postinstall: `node install.js`

 npm ERR! code ELIFECYCLE

npm ERR! errno 1

npm ERR! electron@12.0.11 postinstall: `node install.js`

npm ERR! Exit status 1


Solution:

sudo npm install -g electron --unsafe-perm=true --allow-root


https://www.raspberrypi.org/forums/viewtopic.php?t=278846

Installing NodeJS on a Raspberry PI

curl -sL https://deb.nodesource.com/setup_10.x | sudo -E bash - 

sudo apt-get install -y nodejs 

Sometimes the folks supporting the builds have a glitch, and the ArmV6 version of the build doesn’t get published…. so it will complain with this message:

## You appear to be running on ARMv6 hardware. Unfortunately this is not currently supported by the NodeSource Linux distributions. Please use the ‘linux-armv6l’ binary tarballs available directly from nodejs.org for Node.js v4 and later.”

wget https://nodejs.org/dist/v10.15.3/node-v10.15.3-linux-armv6l.tar.xz tar xvf node-v10.15.3-linux-armv6l.tar.xz cd node-v10.15.3-linux-armv6l sudo cp -R bin/* /usr/bin/ sudo cp -R lib/* /usr/lib/ sudo apt-get update && sudo apt-get upgrade sudo apt-get install build-essential


https://bloggerbrothers.com/2017/03/04/installing-nodejs-on-a-raspberry-pi/

Enabling SSH

sudo systemctl enable ssh

sudo systemctl start ssh

ssh pi@[<em>raspberrypi_ip_address</em>]

###

Secure Shell (SSH) is a feature of Linux that allows you to effectively open a terminal session on your Raspberry Pi from the command line of your host computer.

Recent versions of Rasbpian do not enable SSH access by default.  You can use an empty boot file or raspi-config.

Using a blank boot file

For truly headless setups, if you can't ssh into your Pi you can't turn on ssh!

It's a bit of conundrum! But you can easily get around it by using a trick in Raspbian. To do so, we simply create a file called sshThis file does not exist by default and needs to be created. It can be empty. The system looks for it at boot time and will enable ssh if it is there. It is then deleted. So just create a new file and save it as ssh to the boot folder. If you plug the SD card into your computer, just put that ssh file directly in the SD card director's root directory

learn_raspberry_pi_sshfile.png

Using Raspi-Config

In order to do this, open LX Terminal on your Pi and enter the following command to start Raspi Config:

sudo raspi-config
learn_raspberry_pi_starting_raspi-config.png

Scroll down to the “ssh” option, it might be under Interfaces or Advanced (they move it around)

learn_raspberry_pi_raspi_config_ssh1.png

Hit the Enter key and then select “Enable”

learn_raspberry_pi_raspi_config_ssh2.png

A script will run and then you will see the following as confirmation:

learn_raspberry_pi_raspi_config_ssh3.png

You will need to reboot your Pi to make the change permanent


https://learn.adafruit.com/adafruits-raspberry-pi-lesson-6-using-ssh/enabling-ssh

domingo, 18 de julio de 2021

Manually Reinstall Ubuntu Grub Boot Loader


# ls /dev/sd*
# grub-install /dev/sda


https://www.tecmint.com/rescue-repair-and-reinstall-grub-boot-loader-in-ubuntu/

martes, 13 de julio de 2021

win 10 pro

 You can force install of Pro with a file:


Create a “ei.cfg” file containing the following text:
[EditionID]
Professional
[Channel]
Retail

Save the ei.cfg file to the \Sources folder on your Windows 10 installation media (USB flash drive).
Now when you clean install Windows it will install Pro.


https://answers.microsoft.com/en-us/windows/forum/all/installing-windows-10-pro-instead-of-home/fb62c4e8-8829-41ba-817c-aff3cca51b3b

lunes, 5 de julio de 2021

Bloquea los puertos USB de tu PC


Bloquea los puertos USB de tu PC

Regedit

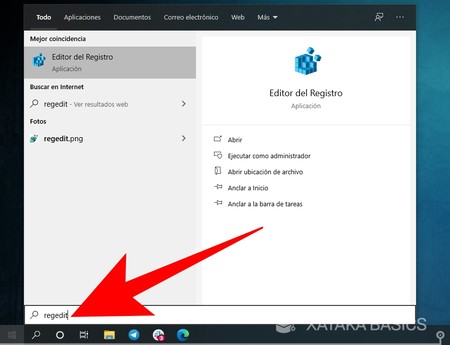
Lo primero que tienes que hacer es abrir el menú de inicio y escribir regedit. Como resultado, te aparecerá el Editor del Registro de Windows, y tienes que entrar en él para hacer los cambios que desactiven los puertos USB.

Services

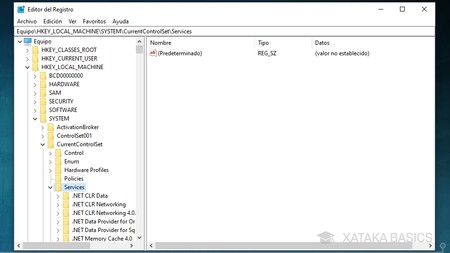
Se abrirá la ventana con el Editor del Registro. En ella, en la columna de la izquierda tendrás las carpetas por las que tienes que navegar hasta llegar a los elementos que quieras cambiar, los cuales aparecerán en la parte de la derecha. Aquí, tienes que llegar a la configuración de los USB, para lo que tendrás que navegar y llegar a la carpeta HKEYLOCALMACHINE\SYSTEM\CurrentControlSet\Services\UsbStor.

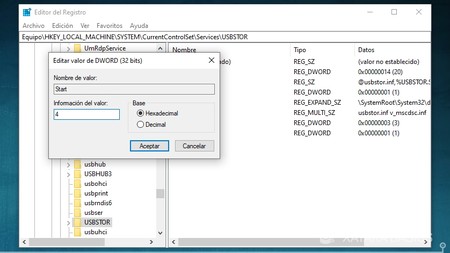
Una vez llegues a la dirección HKEYLOCALMACHINE\SYSTEM\CurrentControlSet\Services\UsbStor, en la parte derecha verás varios elementos diferentes. Aquí, tienes que hacer doble click sobre Start, que como verás en la columna Datos tiene por defecto entre paréntesis el valor 3.
Valor 4

Se abrirá una ventana en la que vas a poder cambiar el valor hexadecimal del campo Start. En esta ventana, cambia el valor 3 por el 4, escribiendo un 4 en su ligar, y aceptando. Ahora, reinicia el ordenador para aplicar los cambios, y los puertos USB quedarán inutilizados. Si te arrepientes, tendrás que volver hasta el campo Start y abrirlo para volver a poner el valor 3, que es el que activa los puertos USB.


https://www.xataka.com/basics/como-bloquear-puertos-usb-ordenador