jueves, 17 de marzo de 2022

Package Creation Chocolatey


Quick Start

Creating Chocolatey Packages - TL;DR version

Here's a TL;DR quick start version of the package creating tutorial. Follow these steps to create a simple package.

Problem? Read the detailed version: Creating Chocolatey Packages

Prerequisites

  • You have Chocolatey installed.
  • You've read What are Chocolatey Packages? first.
  • You know how a package works
    • A package contains a nuspec file. This defines the package. (Docs)
    • A package may contain embedded software.
    • A package may contain an installation script. This can be very simple.

Quick start guide

  • Generate new package:
    • choco new -h will get you started seeing options available to you.
    • Once you figured out all of your options, you should move forward with generating your template.
  • Edit template using common sense
    • cd package-name
    • Edit the package-name.nuspec configuration file.
    • Edit the ./tools/chocolateyInstall.ps1 install script.
    • You must save your files with UTF-8 character encoding without BOM. (Details)
  • Build the package
    • Still in package directory
    • choco pack
      • "Successfully created package-name.1.1.0.nupkg"
  • Test the package
    • Testing should probably be done on a Virtual Machine
    • In your package directory, use:
      • choco install package-name -s . (package-name is the id element in the nuspec)
  • Push the package to the Chocolatey community package repository:
    • Get a Chocolatey account:
    • Copy the API key from your Chocolatey account.
    • choco apikey -k [API_KEY_HERE] -source https://push.chocolatey.org/
    • choco push package-name.1.1.0.nupkg -s https://push.chocolatey.org/ - nupkg file can be ommitted if it is the only one in the directory.

Common Mistakes

  • NuSpec
    • id is the package name and should meet the following criteria:
      • should contain no spaces and weird characters.
      • should be lowercase.
      • should separate spaces in the software name with - e.g. classic-shell. Yes, we realize there are a lot of older packages not following this convention.
    • version is a dot-separated identifier containing a maximum of 4 numbers. e.g. 1.0 or 2.4.0.16 - except for prerelease packages

Environmental Variables

  • %ChocolateyInstall% - Chocolatey installation directory
  • %ChocolateyInstall%\lib\package-name - Package directory
  • %cd% or $pwd - current directory
  • Environment variable reference available in the README when using choco new or online.

Examples

Here are some simple examples.

馃摑 NOTE This needs updated with checksums and newer package concepts. Please run choco new when creating packages as it contains all of the most up to date notes.

chocolateyInstall.ps1 for .exe installer

$name = 'Package Name'
$installerType = 'exe'
$url  = 'http://path/to/download/installer.exe'
$silentArgs = '/VERYSILENT'

Install-ChocolateyPackage $name $installerType $silentArgs $url

馃摑 NOTE You have to figure out the command line switch to make the installer silent, e.g. /VERYSILENT. This changes from installer to installer.

chocolateyInstall.ps1 for .msi installer

馃摑 NOTE Please maintain compatibility with Posh v2. Not every OS we support is on Posh v2 (nor comes OOB with Posh v3+). It's best to work with the widest compatibility of systems out there.

$packageName = 'Package Name'
$installerType = 'msi'
$url = 'http://path/to/download/installer_x86.msi'
$url64 = 'http://path/to/download/installer_x64.msi'
$silentArgs = '/quiet'
$validExitCodes = @(0,3010)

Install-ChocolateyPackage $packageName $installerType $silentArgs $url $url64  -validExitCodes $validExitCodes

Parsing Package Parameters

For a complete example of how you can use the PackageParameters argument of the choco install command, see this How-To.

Tips


https://docs.chocolatey.org/en-us/create/create-packages-quick-start

lunes, 7 de marzo de 2022

How to Compare Two Files in Notepad++


How to Compare Two Files in Notepad++

The compare plugin assumes that you want to compare an old version of your work versus the new version. Open any two files (A, B) in Notepad++, which you want to compare. File B (new) gets compared to File A (old).

Then, navigate to Plugins > Compare Menu > Compare.

It shows the difference/comparison side by side, as shown in the screenshot. You can set any open file as the default. Simply click Compare > Set as First to Compare. Choose this selected file to compare it with other ones in whatever mode you decide.


https://www.makeuseof.com/tag/notepad-compare-two-files-plugin/#:~:text=Open%20any%20two%20files%20(A,as%20shown%20in%20the%20screenshot.

jueves, 3 de febrero de 2022

dotPeek - jetbrains .NET decompiler


.NET decompiler

Decompile .NET assemblies to C#

dotPeek is a free-of-charge standalone tool based on ReSharper's bundled decompiler. It can reliably decompile any .NET assembly into equivalent C# or IL code.

The decompiler supports multiple formats including libraries (.dll), executables (.exe), and Windows metadata files (.winmd).

SQL server check log last select


SELECT t.[text]
FROM sys.dm_exec_cached_plans AS p
CROSS APPLY sys.dm_exec_sql_text(p.plan_handle) AS t
WHERE t.[text] LIKE N'%something something ,something dark site%';

s谩bado, 22 de enero de 2022

Joining PDFs into a single file


One of the easiest ways to join a number of PDFs into a single file is to use the pdftk command.

A pdftk command to join a number of PDFs into a single file might look like this:


$ pdftk recipe-1.pdf recipe-2.pdf recipe-3.pdf recipe-4.pdf recipe-5.pdf cat output recipes.pdf

You can use a wildcard if your files follow a regular pattern like this:

$ pdftk recipe-*.pdf cat output recipes.pdf 
 
https://www.networkworld.com/article/3609508/creating-and-merging-pdfs-on-linux.html 
 workaround
sudo ln -s /snap/pdftk/current/usr/bin/pdftk /usr/bin/pdftk 

mi茅rcoles, 5 de enero de 2022

Visual Studio Crashes and How to Recover a Corrupted .cs File

https://www.samnoble.co.uk/2014/11/30/visual-studio-crashes-and-a-corrupted-cs-file/

Visual Studio Crashes and How to Recover a Corrupted .cs File

In spite of using source control, sometimes it’s still possible to lose work due to the quirks of computers. At least you can mitigate this and only suffer losing a few hours of work, but still, when those few hours were a stroke of genius, the likes of which cannot be reproduced, you can’t help but shed a tear when all is lost. But fear not, here are 4 techniques that you can try to recover your code with before crying.

Lately I’ve used VirtualBox to run Windows 8.1 on my Mac Book Air under Mavericks. My Parallels license expired and I wanted to check out the alternatives. So far it’s been a pleasure to use but recently I’ve experienced it falling over, taking OSX down with it. I’ve probably seen the Grey Screen of Death twice over the last 6 years of using a Mac but have seen it twice in the last week.

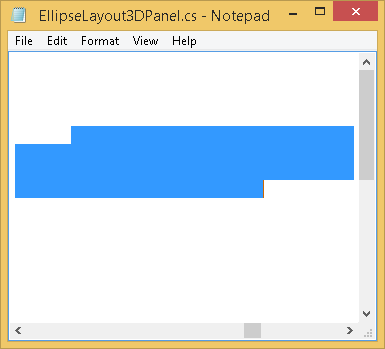
It’s generally not a problem, just a minor inconvenience, until last night. Just as I’m about to wrap up for the day after making some great progress, everything comes crashing down. Once everything is back up and running, I couldn’t open one of my .cs files. Visual Studio would launch Notepad.exe which would display a seemingly empty file, although I could still make text selections:

1. Empty Notepad

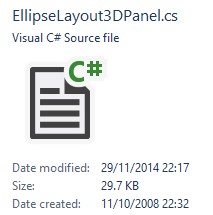
However Explorer reported the file as being 30Kb…

2. Filesize

This gave me hope, the data is still there! It’s probably just a case of a dodgy character somewhere in the file as a result of the crash. What does Notepad++ say?

4. Notepad++

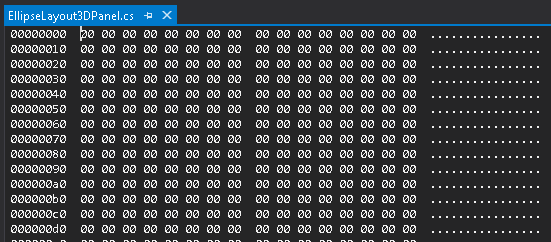
Ok this is looking really bad. Back to Visual Studio, right-click the file in Solution Explorer -> Open With… -> Binary Editor.

3. Binary Content

Oh dear. This doesn’t look good. Apparently it’s a common problem and most likely due the crash occurring whilst that file was being written to on the disk, although in the 10 years that I’ve been working with Visual Studio this is the first time I’ve experienced it. There’s not much one can do to guard against this, other than diagnosing and fixing the cause for Virtualbox crashing, but that’s a whole new problem.

No point crying over spilt milk, let’s just get this fixed! First thing’s first, do not attempt to build your project again as we may need to use the output of the last build to recover your files!

Solution 1 – Decompile

If you have a recent build of your project, you can recover the code from the generated binaries using something like ILSpy (open source) or Dotpeek (free).

https://www.jetbrains.com/decompiler/

If you search around the web for ‘Visual Studio corrupted file’, this is most likely the first solution you’ll find and is often touted as the only solution. Whilst it’s a perfectly practical solution and perhaps your only option, for me it’s a last resort for the following reasons:

  1. All comments and regions are removed.
  2. The code structure will have been lost.
  3. Depending on your build configuration, some optimisation may have taken place.
  4. Doesn’t really help if the code has been obfuscated.

I’m sure you’ll agree it’s better than nothing. If you don’t have any assemblies or you want to try to restore the file to its original awesomeness, continue on.

Solution 2 – AutoRecovery

If you have AutoRecovery enabled, you might be lucky enough to find a backup of the file. Chances are that Visual Studio would’ve prompted you to restore the corrupted file when launching it after the crash. Anyway it’s still worth checking the backup folder for your project, in:

%USERPROFILE%DocumentsVisual Studio [Version]Backup Files[Solution Name]

No dice for me, this directory was empty for me, on to the next solution.

Solution 3 – CHKDSK

Depending on the particulars of the corruption, trusty old chkdsk might help. It might be wise to attempt Solution 4 first to minimise the chances of any data being overwritten.

From an elevated command prompt execute:

chkdsk /f

You’ll receive a message that the drive is locked and the operation will need to be performed on the next restart. Just say ok and restart your machine. Depending on your setup, it could take a while for this to run so be patient.

Solution 4

This was the solution that worked for me and allowed me to recover the full content of my file! I used the free recovery software Recuva. Either use this or whatever you prefer, although instructions here are for Recuva.

Whilst Recuva is primarily for recovering deleted files and this isn’t technically a deleted file, we’re facing a similar challenge. The file is corrupt and pointing to the wrong clusters on the HDD, thus when we load our file it’s loading garbage instead of the correct content.

My first process was:

  1. Launched Recuva and used the Wizard to scan the folder containing my source files. After a few minutes it showed me an empty results window. Not looking good…
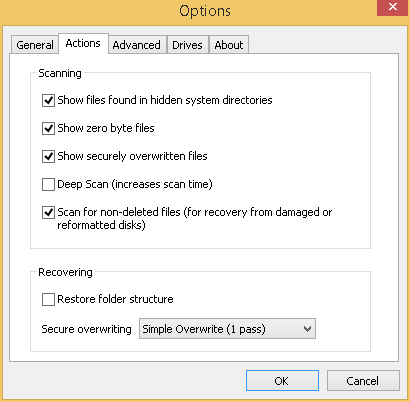
  2. Click on the ‘Options…’ button in the top right hand corner of the window.
  3. In the ‘Actions’ tab select the following: 5. Recuva Options
  4. Hit the ‘Ok’ button.

At this point Recuva started updating the results view, but it still remained empty! Sad face. In a last-ditch effort I quit Recuva, navigated to the source directory in Explorer, right-click, ‘Scan for deleted files’.

Some more dialogs popped up, scanning the drive again until boom, a results view that displayed the contents of the folder, including all the sub-directories. This looks good!

I scrolled down to the file in question and read across the row: ‘Not deleted, Not overwritten’ etc. On the right of the screen there’s a tabbed preview pane. There was no preview available, the ‘Info’ tab looked normal but the ‘Header’ tab was where the magic was!

6. Recovered File

Right click the file in the results pane, ‘Recover Highlighted…’, save to desktop and bingo, fully recovered file. Thanks Recuva!

If you’re ever unlucky to encounter this issue, probably just as you’re about to pack up to go home or preparing for a big tech demo at an investor pitch, one of these solutions will get you unstuck.

If you have any other tips, share them in the comments and I’ll add them to the post.

Edit: Reader ‘bizh’ provided an additional step to Solution 4 if it doesn’t work out fully. I haven’t tested this so proceed at your own risk:

If Recuva is empty, you can delete the corrupted file and then run Recuva. In that case Recuva will definitely find the file and recover the clean version of it

Bizh

martes, 21 de diciembre de 2021

How to export a MS SQL Server database to a SQL script (database to sql file) with Microsoft SQL Server

Generating .sql file of your database with data

SQL Server Management Studio provides the ability to generate scripts for creating databases, tables, stored procedures, functions, views and inserting data. For smaller amounts of data, this method can be used to send table structures and/or data to Scribe Support for testing purposes.

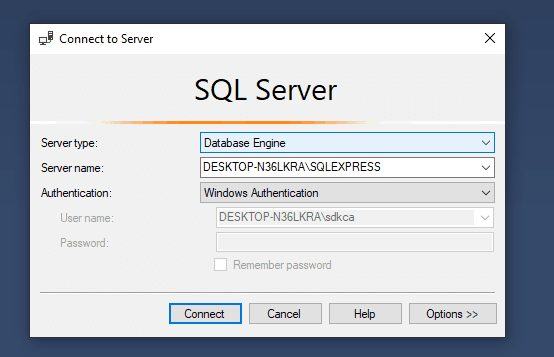
To proceed, Open SSMS and access the database engine with the default Windows authentication (or from the connection that you want to access):

SQL Server Management Studio SSMS Login

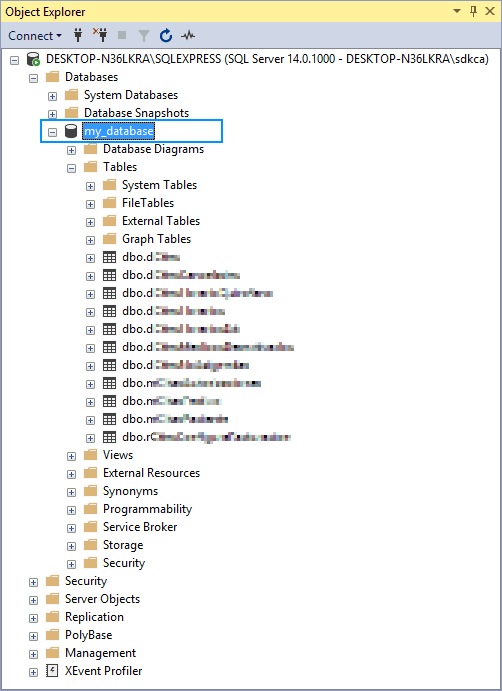
Connect to the server and explore the databases in the object explorer. In our case, we want to export the my_database database, that, as you can see, is available in the Databases directory:

SQL Server Management Studio Database Viewer 

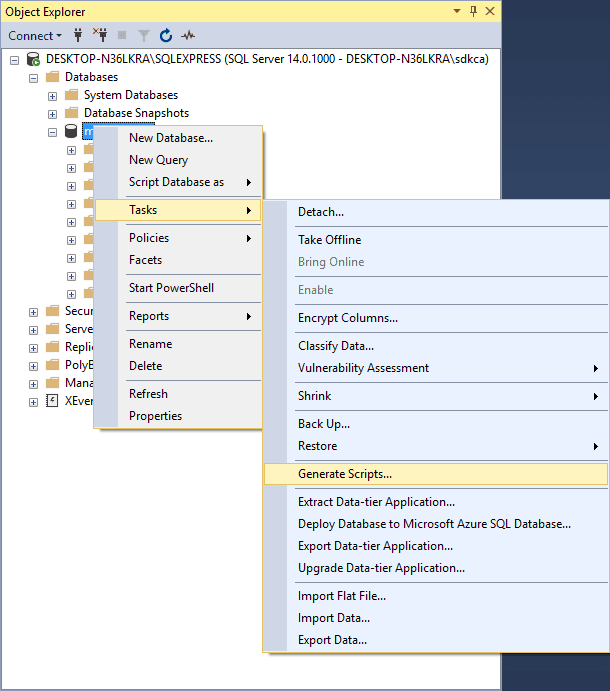
Do right click on the database and select Tasks and then on Generate Scripts:

Generate Scripts SQL Server

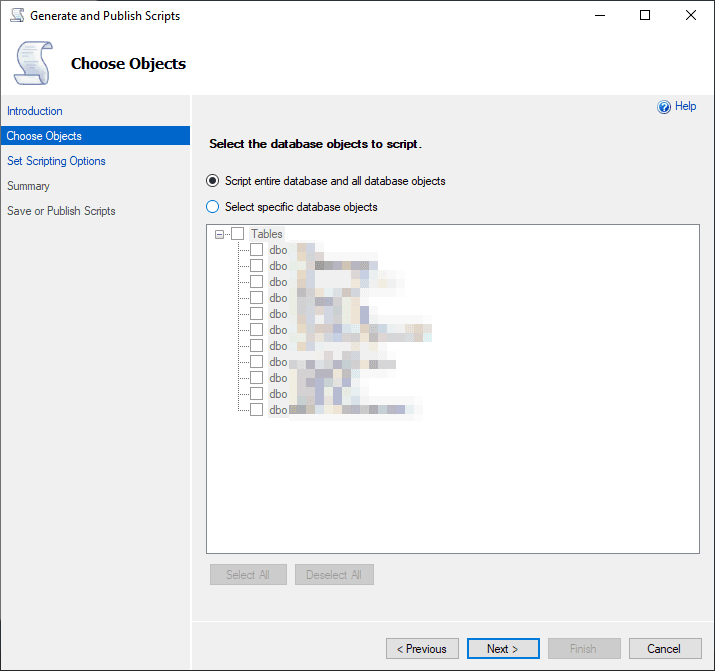
This will open the Generate and Publish Scrips dialog. As first step, define which tables of the database you want to export, optionally you can script the entire database and objects:

Export Tables MS SQL Server Management Studio

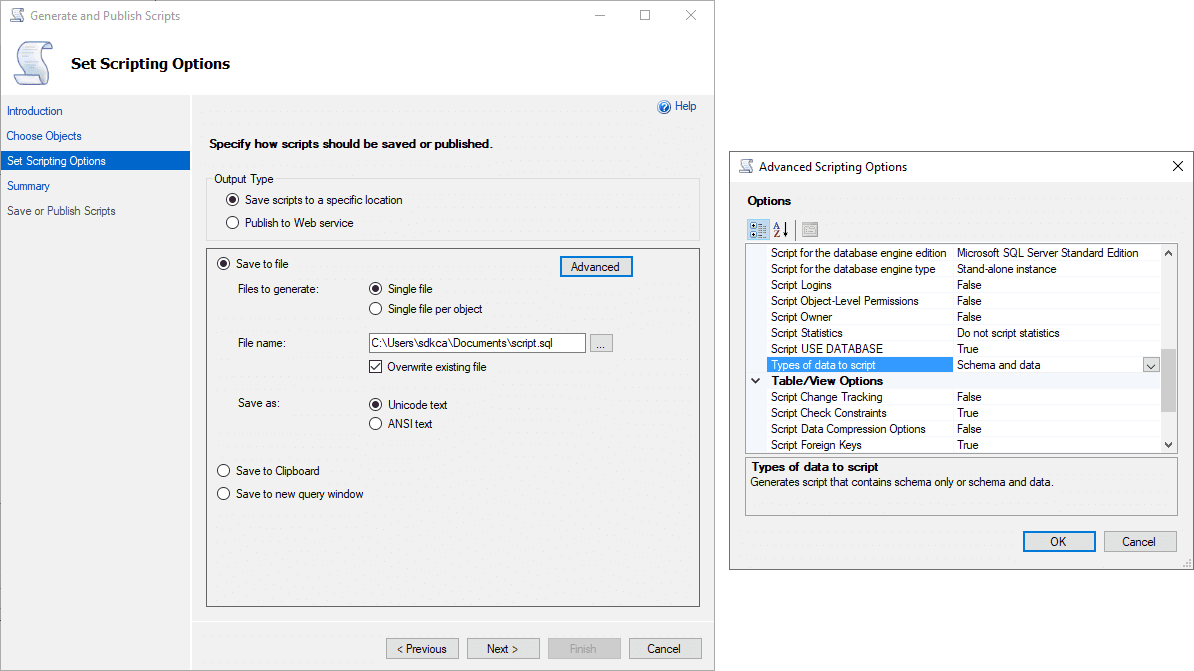
After confirm which tables do you want to export, proceed to define if you want a single file per table or everything in a single file. If you go to the advanced scripting options, you can define the types of data to script, this means if you want to include the data on the file directly or only the structure of the database:

SQL Server Export Data and Structure

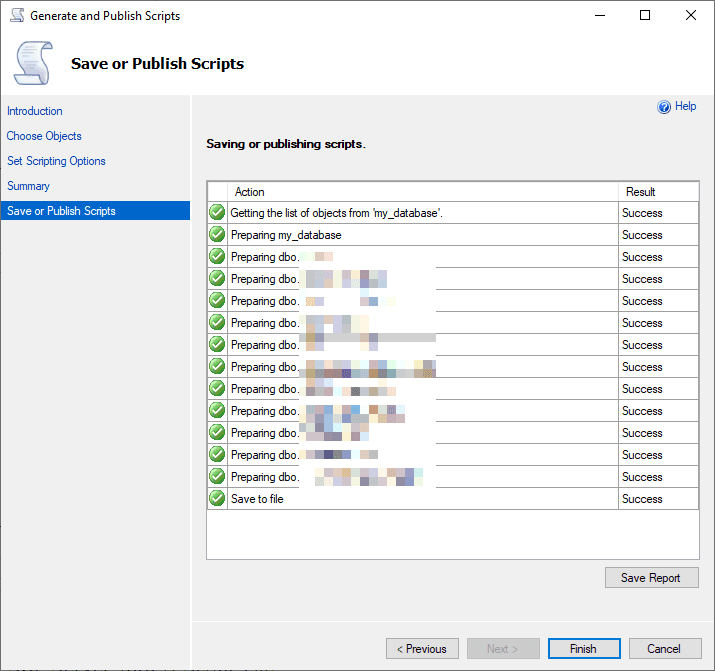
Finally, the export will begin and you will see the success message at the end:

Success SQL Server Script Structure and Data Export


https://ourcodeworld.com/articles/read/846/how-to-export-a-ms-sql-server-database-to-a-sql-script-database-to-sql-file-with-microsoft-sql-server-management-studio-17

s谩bado, 4 de diciembre de 2021

SQL Dump File Splitter

 https://www.rusiczki.net/2007/01/24/sql-dump-file-splitter/

Scenario: You are a conscious user and you back up your site’s database every once in a while. And you sit smiling and content knowing that your precious data is safe. Just to discover after disaster strikes that you can’t restore the contents of the SQL dump file because of upload size limitations or because phpMyAdmin would run out of memory while decompressing the gzip / zip file.

In these cases there are two solutions at hand: if you have console access you can login and import the plain SQL file (which you previously uploaded via FTP) by typing a command like “mysql -uusername -ppassword < dumpfile.sql” or if you only have access to phpMyAdmin you can open up a text editor and split the SQL file into smaller parts that can be uploaded sequentially. The problem si that if you have a larger dump file this can be a reeeaaaly time consuming job.

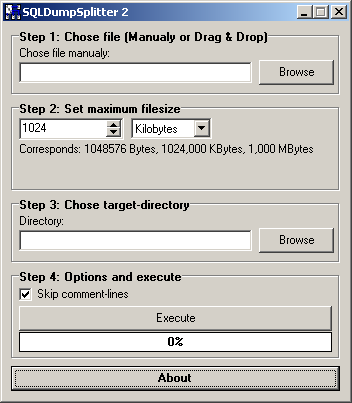
Today I encountered a problem like this. And since I had no console access and I was in no mood to lose a few precious hours splitting up a 40 meg file by hand I googled for “sql splitter” and I found a program called SQLDumpSplitter 2. Unfortunately the author’s site was not working (and since I don’t know any German I couldn’t really figure out why) but I found an alternative download on a dutch web developer forum. And since that forum required to be a member to be able to download I thought I should offer yet another alternative download location without all those registration related mini headaches. Here on this site…

SQLDumpSplitter 2

So here it is ladies and gentlemen: download SQLDumpSplitter 2 (or zip compressed). All credits for writing this program go to Philip Lehmann-B枚hm (http://www.philiplb.de).

Slip sql files

 https://mastergt68.wordpress.com/2013/03/14/muy-buena-utilidad-para-hacer-split-de-archivos-sql/


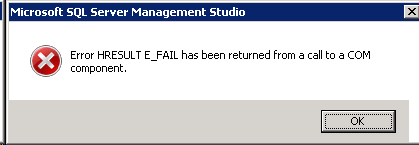
Recientemente, tuve la necesidad de cargar un poco m谩s de 187,000 archivos hacia SQL Server 2008 R2 SP2. Pues nada, abrir el archivo con extensi贸n SQL desde el SQL Server Management Studio y listo. No se帽or; error.

Error SSMS

Bueno, habr谩 que hacer “split” o divisi贸n en varios archivos. Yo ten铆a presente que en SSMS el editor de queries aguanta unas 10,000 entradas, as铆 que proced铆 a ubicar un programa que me ayudase con la divisi贸n y me encontr茅 con GSplit.

Este es un programa gratuito que permite, con diversas condiciones, dividir un archivo grande en varios relacionados, que es justo lo que necesito.

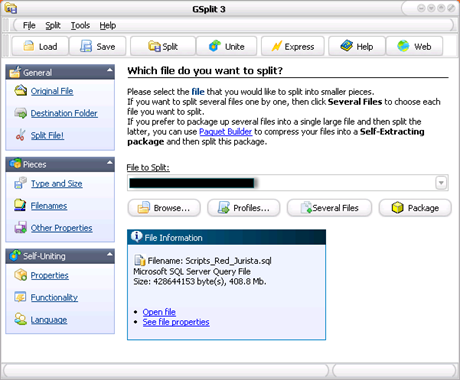
Al abrir el programa, luego de descargarlo e instalarlo obviamente, se encuentra uno con esta pantalla:

GSplit 1

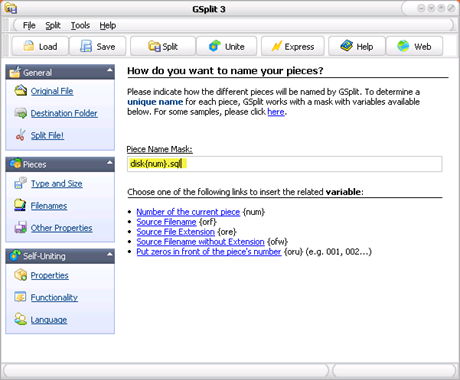
El programa es f谩cil de manejar y solo hay que indicar el archivo original, la carpeta destino y la manera en la cual las “piezas” se generar谩n. En mi caso en particular, defin铆 dichas piezas de esta manera:

GSplit 2

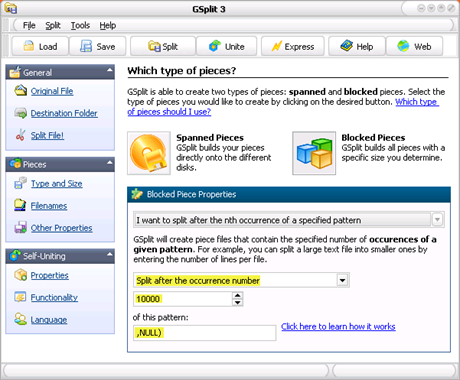
Y en tipo y tama帽o, especifiqu茅 lo siguiente:

GSplit 3

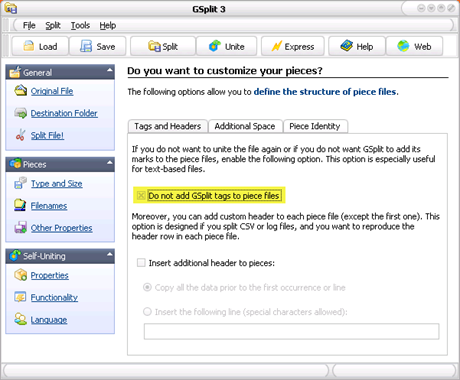
Importante, revisar en “Other Properties” para dejarla as铆:

GSplit 4

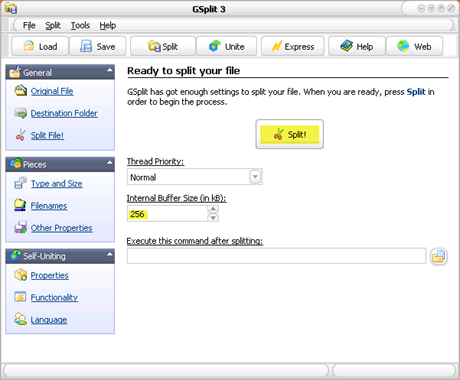
Luego de esto, van al link “Split File!” y presionan Split!:

GSplit 5

Asegurense de incrementar el tama帽o del buffer; en mi caso, lo dej茅 en 256 KB.

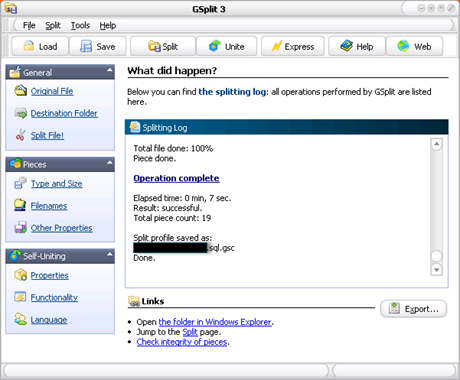
Luego de algunos segundos, aparece esta ventana indicando que el proceso fue exitoso:

GSplit 6

viernes, 12 de noviembre de 2021

nuget.psm1 porque la ejecuci贸n de scripts est谩 deshabilitada en este sistema.

 'Abrimos el Windows PowerShell como administrador y ejecutamos:'


Get-ExecutionPolicy


'Nos tendr铆a que devolver «restricted». (Restringido)'
'Para cambiar esta configuraci贸n basta con ejecutar:'


Set-ExecutionPolicy Unrestricted


https://www.codegrepper.com/code-examples/shell/Habilitar+la+ejecuci%C3%B3n+de+scripts+para+Powershell

jueves, 11 de noviembre de 2021

SQL SERVER procedure Buscar


CREATE procedure dbo.buscar

@Desc            VARCHAR(255)

,@Tipo            VARCHAR(2)


AS


BEGIN 


    IF UPPER(@Tipo) = 'T'

    BEGIN

        SELECT 

            NAME

        FROM  

            SYSOBJECTS 

        WHERE

            ID IN (SELECT 

                    ID 

                FROM 

                    SYSCOMMENTS 

                WHERE 

                    TEXT LIKE ('%' + @Desc + '%')

                )

        ORDER BY 

            NAME

    END


    IF UPPER(@Tipo) = 'C'

    BEGIN

        SELECT 

            NAME

        FROM  

            SYSOBJECTS 

        WHERE

            ID IN (SELECT 

                    ID 

                FROM 

                    SYSCOLUMNS 

                WHERE 

                    NAME LIKE ('%' + @Desc + '%')

                )

        ORDER BY 

            NAME

    END


    SELECT

        NAME

    FROM

        SysObjects 

WHERE

        xType = @Tipo

        AND

        name like ('%' + @Desc + '%')

    ORDER BY 

        NAME

END        


Saber que Jobs estan en ejecucion SQL SERVER


SELECT

j.name AS 'Nombre del Job',

ja.start_execution_date AS 'Inicio a las:',

Datediff(ss, ja.start_execution_date, Getdate()) AS 'Ha corrido por: (Segundos)'

FROM   msdb.dbo.sysjobactivity ja

INNER JOIN msdb.dbo.sysjobs J

ON j.job_id = ja.job_id

WHERE  job_history_id IS NULL

AND ja.start_execution_date IS NOT NULL

ORDER  BY start_execution_date

Convertir String a DateTime C#


string date = "01/08/2008";
DateTime dt = Convert.ToDateTime(date);           
Console.WriteLine("Year: {0}, Month: {1}, Day: {2}", dt.Year, dt.Month, dt.Day);

Ejemplo obtener programas instalados en pc cmd

WMIC  /output:C:\appsinstaladas.txt product get name,version

lunes, 1 de noviembre de 2021

How to convert DateTime to VarChar

DECLARE @now datetime
SET @now = GETDATE()
select convert(nvarchar(MAX), @now, 0) as output, 0 as style 
union select convert(nvarchar(MAX), @now, 1), 1
union select convert(nvarchar(MAX), @now, 2), 2
union select convert(nvarchar(MAX), @now, 3), 3
union select convert(nvarchar(MAX), @now, 4), 4
union select convert(nvarchar(MAX), @now, 5), 5
union select convert(nvarchar(MAX), @now, 6), 6
union select convert(nvarchar(MAX), @now, 7), 7
union select convert(nvarchar(MAX), @now, 8), 8
union select convert(nvarchar(MAX), @now, 9), 9
union select convert(nvarchar(MAX), @now, 10), 10
union select convert(nvarchar(MAX), @now, 11), 11
union select convert(nvarchar(MAX), @now, 12), 12
union select convert(nvarchar(MAX), @now, 13), 13
union select convert(nvarchar(MAX), @now, 14), 14
--15 to 19 not valid
union select convert(nvarchar(MAX), @now, 20), 20
union select convert(nvarchar(MAX), @now, 21), 21
union select convert(nvarchar(MAX), @now, 22), 22
union select convert(nvarchar(MAX), @now, 23), 23
union select convert(nvarchar(MAX), @now, 24), 24
union select convert(nvarchar(MAX), @now, 25), 25
--26 to 99 not valid
union select convert(nvarchar(MAX), @now, 100), 100
union select convert(nvarchar(MAX), @now, 101), 101
union select convert(nvarchar(MAX), @now, 102), 102
union select convert(nvarchar(MAX), @now, 103), 103
union select convert(nvarchar(MAX), @now, 104), 104
union select convert(nvarchar(MAX), @now, 105), 105
union select convert(nvarchar(MAX), @now, 106), 106
union select convert(nvarchar(MAX), @now, 107), 107
union select convert(nvarchar(MAX), @now, 108), 108
union select convert(nvarchar(MAX), @now, 109), 109
union select convert(nvarchar(MAX), @now, 110), 110
union select convert(nvarchar(MAX), @now, 111), 111
union select convert(nvarchar(MAX), @now, 112), 112
union select convert(nvarchar(MAX), @now, 113), 113
union select convert(nvarchar(MAX), @now, 114), 114
union select convert(nvarchar(MAX), @now, 120), 120
union select convert(nvarchar(MAX), @now, 121), 121
--122 to 125 not valid
union select convert(nvarchar(MAX), @now, 126), 126
union select convert(nvarchar(MAX), @now, 127), 127
--128, 129 not valid
union select convert(nvarchar(MAX), @now, 130), 130
union select convert(nvarchar(MAX), @now, 131), 131
--132 not valid
order BY style

 https://stackoverflow.com/questions/74385/how-to-convert-datetime-to-varchar