https://www.sqlmatters.com/Articles/Converting%20row%20values%20in%20a%20table%20to%20a%20single%20concatenated%20string.aspx
jueves, 25 de mayo de 2023

martes, 23 de mayo de 2023
sql server separar cadenas
CREATE FUNCTION [dbo].[SepararCadena](@cadena NVARCHAR(MAX),
@delimitador CHAR(1))
RETURNS @output TABLE(splitData NVARCHAR(MAX))
AS
BEGIN
DECLARE @start INT
DECLARE @end INT
SELECT @start = 1,
@end = CHARINDEX(@delimitador, @cadena)
WHILE @start < LEN(@cadena) + 1
BEGIN
IF @end = 0
SET @end = LEN(@cadena) + 1
INSERT INTO @output(splitData)
VALUES(SUBSTRING(@cadena, @start, @end-@start))
SET @start = @end + 1
SET @end = CHARINDEX(@delimitador, @cadena, @start)
END
RETURN
END
martes, 18 de abril de 2023

lunes, 17 de abril de 2023
proxmox: TASK ERROR: KVM virtualisation configured, but not available. Either disable in VM configuration or enable in BIOS.
https://forum.proxmox.com/threads/error-when-i-create-new-vm.38706/

jueves, 30 de marzo de 2023
generar int id compuesto sql server
CREATE TABLE [dbo].[Tabla1](
[Id] [varchar](10) NOT NULL,
[Descripcion] [varchar](50) NOT NULL,
[Activo] [bit] NOT NULL,
[ParentId] AS (CONVERT([int],left([id],charindex('.',[id]+'.')-(1)),0))
)
##
CREATE PROCEDURE [dbo].[GENERAR_ID_COMPUESTO] @idNuevo AS INT
AS
BEGIN
DECLARE @id AS VARCHAR(20);
SET @id= CONVERT(VARCHAR(10), @idNuevo) + '.' + CONVERT(VARCHAR(20),
(
SELECT ISNULL(MAX(CONVERT(INTEGER, (CASE
WHEN(LEN(Id) - LEN(REPLACE(Id, '.', ''))) = 1
THEN SUBSTRING(Id, PATINDEX('%.%', Id) + 1, LEN(Id))
WHEN(LEN(Id) - LEN(REPLACE(Id, '.', ''))) = 2
THEN SUBSTRING(Id, PATINDEX('%.%', Id) + 1, PATINDEX('%.%', (SUBSTRING(Id, PATINDEX('%.%', Id) + 1, LEN(Id)))) - 1)
ELSE 0
END))), 1) + 1
FROM Tabla1
WHERE(CASE
WHEN(LEN(Id) - LEN(REPLACE(Id, '.', ''))) = 0
THEN Id
WHEN(LEN(Id) - LEN(REPLACE(Id, '.', ''))) > 0
THEN SUBSTRING(Id, 0, PATINDEX('%.%', Id))
ELSE 0
END) = @idNuevo
AND (CASE
WHEN(LEN(Id) - LEN(REPLACE(Id, '.', ''))) = 2
THEN REVERSE(SUBSTRING(REVERSE(Id), 0, PATINDEX('%.%', REVERSE(Id))))
ELSE 0
END) = 0
));
SELECT @id;
END;
##
--example
DECLARE @id as NUMERIC(18,0)
EXECUTE Ceres.dbo.SYNC_GENERAR_NAVEID 23, @id OUTPUT;
-- result: 23.3
--insert into Tabla1 (id) select @id
DECLARE @id as NUMERIC(18,0)
EXECUTE Ceres.dbo.SYNC_GENERAR_NAVEID 23, @id OUTPUT;
-- result: 23.4
--insert into Tabla1 (id) select @id
OUTPUT sql server
In SQL Server, you can return multiple output parameters from a stored procedure using the OUTPUT keyword for each output parameter. Here is an example of how to do this:
ALTER PROCEDURE myStoredProcedure
@inputParam1 INT,
@inputParam2 VARCHAR(50),
@outputParam1 INT OUTPUT,
@outputParam2 VARCHAR(50) OUTPUT
AS
BEGIN
-- your stored procedure code here
SET @outputParam1 = 12345
SET @outputParam2 = 'Hello World'
END
DECLARE @output1 INT
DECLARE @output2 VARCHAR(50)
EXEC myStoredProcedure 1, 'input2', @output1 OUTPUT, @output2 OUTPUT
SELECT @output1 AS 'Output 1', @output2 AS 'Output 2'
viernes, 24 de marzo de 2023
Integración Git/GitHub/VS2010
https://elprogramadorperdido.wordpress.com/2012/12/07/integracion-gitgithubvs2010/
Integración Git/GitHub/VS2010
...
- Integrar Git con Visual Studio 2010
Para integrar Git con Visual Studio 2010 debemos descargar la extensión Git Source Control Provider bien desde el propio Visual Studio
Herramientas->Administrador de extensiones->Galería en línea buscar el paquete Git Source Control Provider
o bien desde la siguiente url:
http://visualstudiogallery.msdn.microsoft.com/63a7e40d-4d71-4fbb-a23b-d262124b8f4c
Después de haber realizado la instalación, debemos reiniciar Visual Studio 2010 e ir a Herramientas->Opciones->Source Control, y seleccionar Git Source Control Provider.
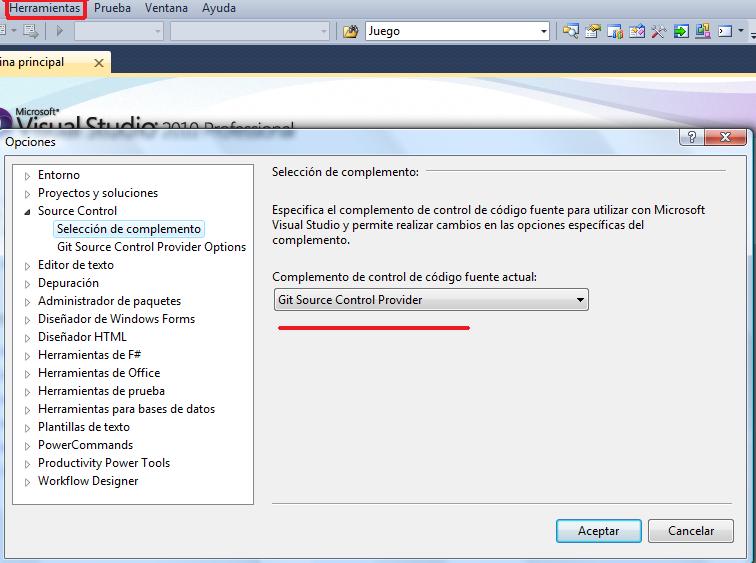
Por último nos quedaría por instalar las Git Extensions para poder manejarnos, sin utilizar la línea de comandos Git bash.
– URL de descarga: http://code.google.com/p/gitextensions/downloads/list
solo tenemos que descargar la última versión, instalar en nuestra máquina y listo, tendremos una nueva opción en el menu principal de Visual Studio llamada GIT.
 en el proximo post hablaremos de las acciones: git init, git remote, git commit, git pull, git push, etc…
jueves, 23 de marzo de 2023
ejecutar multiples SP_HELPTEXT SQL Server
https://forums.sqlteam.com/t/run-sp-helptext-for-multiple-views/19791
CREATE TABLE #text ( id int IDENTITY(1, 1) NOT NULL, text_line varchar(max) NULL );
INSERT INTO #text EXEC sys.SP_HELPTEXT store1
INSERT INTO #text EXEC sys.SP_HELPTEXT store2
jueves, 9 de febrero de 2023
SQL Server EXEC result INTO TABLE in LOOP
CREATE TABLE #tmp(columnName INT);
INSERT INTO #tmp
EXECUTE query_1
@parameter1,
@parameter2,
@parameter3;
loop
CREATE TABLE #tabla
(v6 INT,
v5 VARCHAR(255),
v4 VARCHAR(10),
v4 INT,
v3 DATETIME,
v2 DATETIME,
v1 VARCHAR(10)
);
DECLARE @Contador INT;
SET @Contador = 0;
WHILE(@Contador <= 10)
BEGIN
INSERT INTO #tabla
EXECUTE query_2
1,
@Contador;
SET @Contador = @Contador + 1;
END;
SELECT *
FROM #tabla;
viernes, 23 de diciembre de 2022
Embedding QR Code Scanner In Xamarin.Forms
https://www.c-sharpcorner.com/article/embedding-qr-code-scanner-in-xamarin-forms/Dropdown in Xamarin.Forms
ZXing.Net.Mobile plugin is a useful plugin to facilitate scanning barcodes as effortlessly and painlessly as possible in our own applications works Xamarin.iOS, Xamarin.Android, Tizen, and UWP.
Library Link: https://github.com/Redth/ZXing.Net.Mobile
Without much introduction, we will skip into the coding part of this article.
Coding Part
Here, I will explain the steps to create Dropdown in Xamarin.Forms.
- Step 1: Creating a new Xamarin.Forms Projects.
- Step 2: Setting up the scanner in Xamarin.Forms .Net Standard Project
- Step 3: Implementation of QR Code Scanner inside the screen/page
Step 1 - Creating new Xamarin.Forms Projects
Create New Project by Selecting New -> Project -> Select Xamarin Cross Platform App and Click OK.
Note
Xamarin.Forms version should be greater than 4.5.

Then select Android and iOS Platforms as shown below with Code Sharing Strategy as PCL or .Net Standard and click OK.

Step 2 - Setting up the scanner in Xamarin.Forms .Net Standard Project
In this step, we will see how to setup the plugin.
Open the Nuget Manager in the Visual Studio Solution by right clicking the solution and select “Manage Nuget Packages”.

Then “ZXing.Net.Mobile” and check all the projects in the solution, install the plugin

After the installation, we need to do some additional setup in the platform wise projects.
In Android, update the below code blocks in the MainActivity to initialize the plugin.
Step 3 - Implementation of QR Code Scanner inside the screen/page
In this step, we will see how to use the view in Xamarin.Forms.
Open your designer file and in my case MainPage.xaml and add the ZxingSannerView as shown below.
Add Label below the ZxingSannerView to see the results when the bar/QR code is scanned.
Then add the below event to know the successful scan from the control.
Full Code implementation of ZXing Scanner View in MainPage
Here, we will see the full code for Main Page.
Demo
The following screens show the output of this tutorial and it is awesome to have this dropdown in Xamarin.Forms


viernes, 16 de diciembre de 2022
lunes, 12 de diciembre de 2022
DATEPART sql server
select DATEPART(YY, getdate() ) AS Year,
DATEPART(QQ, getdate() ) AS Quarter,
DATEPART(WK, getdate() ) AS Week,
DATEPART(DY, getdate() ) AS dayofYear,
DATEPART(MM, getdate() ) AS Month,
DATEPART(DD, getdate() ) AS Date,
DATEPART(hour, getdate() ) AS Hour,
DATEPART(minute, getdate() ) AS Minute,
DATEPART(second, getdate() ) AS Second,
DATEPART(millisecond, getdate() ) AS Millsecond,
DATEPART(microsecond, getdate() ) AS Microsecond,
DATEPART(nanosecond, getdate() ) AS Nanosecond
Year Quarter Week dayofYear Month Date Hour Minute Second Millsecond
2022 4 51 346 12 12 12 15 2 677
How to Pass Command Line Arguments using Visual Studio ?
https://dailydotnettips.com/how-to-pass-command-line-arguments-using-visual-studio/
You are writing one application in Visual Studio which accepts some command line parameter to do some operation. You pass command-line arguments to the program when it’s been invoked from the command line. But how did you do it from Visual Studio? You want to test your application, and do you really want to open the command prompt every time to pass the command line values. Really not. Here is a quick tip for all of you.
Visual Studio enables nice features where you can do this on the Debug tab. Here are the steps to achieve this
1. Right Click on Project from Solution Explorer and Select Properties.
2. In the Project Properties Windows, Navigate to “Debug Tab”
3. You will find the text box “Command Line”
Well, here you can type the command line separated by Space.

Just write a simple console application to print the command line argument, and put a breakpoint to check the arguments,

So, each value separated by space has taken has a command-line argument. This will produce below output.

3 Ways to Fix the CORS Error — and How the Access-Control-Allow-Origin Header Works
https://medium.com/@dtkatz/3-ways-to-fix-the-cors-error-and-how-access-control-allow-origin-works-d97d55946d9
3 Ways to Fix the CORS Error — and How the Access-Control-Allow-Origin Header Works
The Cors Error
Seen this before? Seeing it right now?
When working with APIs in your application code, honestly, this bug creeps up more often than it should. And every time, the reaction is the same:

Fix one: install the Allow-Control-Allow-Origin plugin
The quickest fix you can make is to install the moesif CORS extension . Once installed, click it in your browser to activate the extension. Make sure the icon’s label goes from “off”:

to “on”:
Then refresh your application, and your API requests should now work! 🎉
But the plugin fix is deceiving
The plugin definitely addresses the issue. However, this fix only applies to your own machine. In local development, it’s fine to have a plugin installed that can help you get past the error.
But once you publish your application, you can’t expect your users to install the plugin too. It wouldn’t be the wisest business decision…
There’s gotta be better solutions. To get there, let’s answer a couple questions:
Why was the CORS error there in the first place?
The error stems from a security mechanism that browsers implement called the same-origin policy.
The same-origin policy fights one of the most common cyber attacks out there: cross-site request forgery. In this maneuver, a malicious website attempts to take advantage of the browser’s cookie storage system.
For every HTTP request to a domain, the browser attaches any HTTP cookies associated with that domain. This is especially useful for authentication, and setting sessions. For instance, it’s feasible that you would sign into a web app like facebook-clone.com. In this case, your browser would store a relevant session cookie for the facebook-clone.com domain:
And this is great! The session cookie gets stored. And every time you re-visit the facebook-clone.com tab, and click around the app, you don’t have to sign in again. Instead, the API will recognize the stored session cookie upon further HTTP requests.
The only trouble is that the browser automatically includes any relevant cookies stored for a domain when another request is made to that exact domain. Therefore, a scenario like this can happen. Say you clicked on a particularly trick popup add, opening evil-site.com.
The evil site also has the ability send a request to facebook-clone.com/api. Since the request is going to the facebook-clone.com domain, the browser includes the relevant cookies. Evil-site sends the session cookie, and gains authenticated access to facebook-clone. Your account has been successfully hacked with a cross-site request forgery attack.
Luckily, in this situation, like a hawk ready to strike, the browser will step in and prevent the malicious code from making an API request like this. It will stop evil-site and say “Blocked by the same-origin policy. 🕶️”
How does the same-origin policy work under the hood?
Under the hood, the browser checks if the origins of the web application and the server match. Above, the origins were simplified to the frontend application and backend server domains. But really, the origin is the combination of the protocol, host, and port. For example, in https://www,facebook-clone.com, the protocol is https://, the host is www.facebook-clone.com, and the hidden port number is 443 (the port number typically used for https).
To conduct the same-origin check, the browser accompanies all requests with a special request that sends the domain information receiving server. For example, for an app running on localhost:3000, the special request format looks like this:
Origin: http://localhost:3000Reacting to this special request, the server sends back a response header. This header contains an Access-Control-Allow-Origin key, to specify which origins can access the server’s resources. The key will have one of two values:
One: the server can be really strict, and specify that only one origin can access it:
Access-Control-Allow-Origin: http://localhost:3000Two: the server can let the gates go wide open, and specify the wildcard value to allow all domains to access its resources:
Access-Control-Allow-Origin: *Once the browser receives this header information back, it compares the frontend domain with the Access-Control-Allow-Origin value from the server. If the frontend domain does not match the value, the browser raises the red flag and blocks the API request with the CORS policy error.
Did the plugin “fix” it?
In short, no. The access-control-allow-origin plugin essentially turns off the browser’s same-origin policy. For every request, it will add the Access-Control-Allow-Origin: * header to the response. It tricks the browser, and overrides the CORS header that the server has in place with the open wildcard value.
Now, it’s fine to leave this plugin on in local development. It’s possible that you already know that the server specifies the Access-Control-Allow-Origin header as the published frontend domain for your app. Then by all means, use the plugin in development to allow the localhost domain to make requests within the browser.
But if you’re consuming another API, the plugin hasn’t “fixed” the issue. As mentioned before, you wouldn’t want to demand that your users install a plugin to access your code.
Fix two: send your request to a proxy
You can’t ask your users to trick their browsers by installing a plugin that applies an header in the frontend. But you can control the backend address that the web app’s API requests are going to.
The cors-anywhere server is a proxy that adds CORS headers to a request. A proxy acts as an intermediary between a client and server. In this case, the cors-anywhere proxy server operates in between the frontend web app making the request, and the server that responds with data. Similar to the Allow-control-allow-origin plugin, it adds the more open Access-Control-Allow-Origin: * header to the response.
It works like this. Say your frontend is trying to make a GET request to:
https://joke-api-strict-cors.appspot.com/jokes/random
But this api does not have a Access-Control-Allow-Origin value in place that permits the web application domain to access it. So instead, send your GET request to:
https://cors-anywhere.herokuapp.com/https://joke-api-strict-cors.appspot.com/jokes/random
The proxy server receives the https://joke-api-strict-cors.appspot.com/jokes/random from the url above. Then it makes the request to get that server’s response. And finally, the proxy applies the Access-Control-Allow-Origin: * to that original response.
This solution is great because it works in both development and production. In summary, you’re taking advantage of the fact that the same origin policy is only implemented in browser-to-server communication. Which means it doesn’t have to be enforced in server-to-server communication!
The one downside of the cors-anywhere proxy is that can often take a while to receive a response. The latency is high enough to make your applications appear a bit sluggish.
This brings us to a final, even better approach.
Fix three: build your own proxy
The fix I recommend in situations like this, is to build your own proxy! Exactly like the previous solution, you’re utilizing the fact that the same origin policy is not enforced within server-to-server communication. In addition, you eliminate the latency concern. You don’t need to share the cors-anywhere proxy with other consumers, and you can dedicate as many resources as you need to your own servers.
Here’s some quick Node.js code that uses the express web framework to create a proxy server around the same https://joke-api-strict-cors.appspot.com/ from above:
How does this work? The proxy uses express middleware to apply a Access-Control-Allow-Origin: * header to every response from the server. At its own jokes/random GET endpoint, the proxy requests a random joke from another server. The same-origin policy doesn’t step in to block the request, even though the domains are different. After all, this is a server-to-server request. Finally, the proxy creates a response to the original requester (an app on the browser) consisting of the resulting data and the middleware-applied Access-Control-Allow-Origin: * header.
Conclusion
The CORS error can be the bane of the frontend developer. But once you understand the underlying same-origin policy behind the error, and how it fights the malicious cross-site request forgery attack, it becomes a little more bearable.
Ultimately, with these fixes, you’ll never have to break a sweat over seeing that red CORS error in your browser console logs again. Instead, in its face, you’ll whip out the plugin or a proxy, and exclaim:
Connect with David
Suscribirse a:
Entradas (Atom)